Linksys DSHUB24 User Guide - Page 18
Trap Receivers Sub-Menu, finished editing the table, press X to return to the SNMP
 |
UPC - 745883548699
View all Linksys DSHUB24 manuals
Add to My Manuals
Save this manual to your list of manuals |
Page 18 highlights
Trap Receivers Sub-Menu Once inside the trap menu, you can add, delete, or change entries on the table. A sample menu is shown below. Network Management Module Setup SNMP/Trap Menu Entry Address Community Protocol [1] 192.168.0.100 PUBLIC IP [2] 192.168.0.34 PUBLIC IP [3] 192.168.0.76 PUBLIC IP [A] Add New Table Entry [D] Delete Table Entry [X] Exit Press a number (1-3) to change an existing table entry, or press A to Add, D to Delete, or X to Exit: By pressing the table entry ID number, you can edit the entry's IP address, read community and protocol values. Once you are finished editing the table, press X to return to the SNMP Configuration menu. Press X once more to return to the main menu. 15
-
 1
1 -
2
-
3
-
4
-
5
-
6
-
7
-
8
-
9
-
10
-
11
-
12
-
 13
13 -
 14
14 -
 15
15 -
 16
16 -
 17
17 -
 18
18 -
 19
19 -
 20
20 -
 21
21 -
 22
22 -
 23
23 -
24
-
25
-
26
-
27
-
28
-
29
-
30
-
31
-
32
-
33
-
34
-
35
-
36
-
37
-
38
-
39
-
40
-
41
-
42
 |
 |

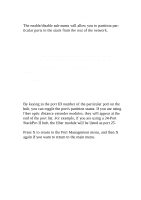
Trap Receivers Sub-Menu
Once inside the trap menu, you can add, delete, or change
entries on the table. A sample menu is shown below.
Network Management Module Setup
SNMP/Trap Menu
--------------------------------------------------
Entry
Address
Community
Protocol
--------------------------------------------------
[1] 192.168.0.100 PUBLIC
IP
[2] 192.168.0.34
PUBLIC
IP
[3] 192.168.0.76
PUBLIC
IP
[A] Add New Table Entry
[D] Delete Table Entry
[X] Exit
Press a number (1-3) to change an existing table
entry, or press A to Add, D to Delete, or X to
Exit:
By pressing the table entry ID number, you can edit the entry's
IP address, read community and protocol values. Once you are
finished editing the table, press X to return to the SNMP
Configuration menu. Press X once more to return to the main
menu.
15