Linksys NMH300 User Guide - Page 8
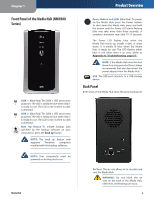
Product Overview, Use the four included screws to secure the hard disk - media hub
 |
UPC - 745883586646
View all Linksys NMH300 manuals
Add to My Manuals
Save this manual to your list of manuals |
Page 8 highlights
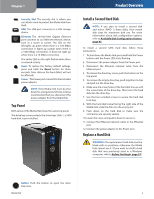
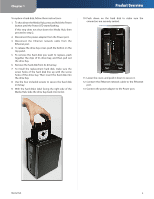
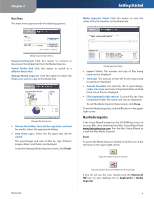
Chapter 1 To replace a hard disk, follow these instructions: 1. To shut down the Media Hub, press and hold the Power button until the Power LED starts flashing. If this step does not shut down the Media Hub, then proceed to step 2. 2. Disconnect the power adapter from the Power port. 3. Disconnect the Ethernet network cable from the Ethernet port. 4. To release the drive bay cover, push the button on the top panel. 5. To remove the hard disk you want to replace, push together the clips of its drive bay, and then pull out the drive bay. 6. Remove the hard disk from its drive bay. 7. To install the replacement hard disk, make sure the screw holes of the hard disk line up with the screw holes of the drive bay. Then insert the hard disk into the drive bay. 8. Use the four included screws to secure the hard disk in its bay. 9. With the hard disk's label facing the right side of the Media Hub, slide the drive bay back into its slot. Product Overview 10. Push down on the hard disk to make sure the connectors are securely seated. 11. Lower the cover, and push it down to secure it. 12. Connect the Ethernet network cable to the Ethernet port. 13. Connect the power adapter to the Power port. Media Hub 4
-
 1
1 -
2
-
 3
3 -
 4
4 -
 5
5 -
 6
6 -
 7
7 -
 8
8 -
 9
9 -
 10
10 -
 11
11 -
 12
12 -
 13
13 -
14
-
15
-
16
-
17
-
18
-
19
-
20
-
21
-
22
-
23
-
24
-
25
-
26
-
27
-
28
-
29
-
30
-
31
-
32
-
33
-
34
-
35
-
36
-
37
-
38
-
39
-
40
-
41
-
42
-
43
-
44
-
45
-
46
-
47
-
48
-
49
-
50
-
51
-
52
-
53
-
54
-
55
-
56
-
57
-
58
-
59
-
60
-
61
-
62
-
63
-
64
-
65
-
66
-
67
-
68
-
69
-
70
-
71
-
72
-
73
-
74
-
75
-
76
-
77
-
78
-
79
-
80
-
81
 |
 |
