Linksys WIP310 Cisco WIP310 User Guide - Page 14
Using the PIN Connect Method, Wi-Fi Protected Setup, Select, Power/End Call - default password
 |
UPC - 745883580927
View all Linksys WIP310 manuals
Add to My Manuals
Save this manual to your list of manuals |
Page 14 highlights
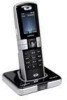
Chapter 2 Installing the WIP310 Setup Instructions Press the Wi-Fi Protected Setup button on your router. Settings Menu 3. Press the Select button to view your options. 4. Navigate to Connect by using PIN. Wi-Fi Protected Setup button Within two minutes, press the Select button (green check mark icon) on your phone. The phone displays a message if the connection is successful. NOTE: If the connection is successful, the phone creates a Wi-Fi Profile automatically. To view, edit, or manage your Wi-Fi Profiles, see Manually Configuring Your Wireless Connection. Using the PIN Connect Method You can also connect your phone to the wireless network by entering the phone's PIN on your wireless router. 1. Press the Power/End Call button to power on the phone. Power/End Call button 2. When the Home screen appears, press the Select button to display the Settings menu. Press the Select Button again and navigate to the Wireless Setup menu. Connect Screen 5. Press the Select button. Your phone's PIN is displayed. WPS PIN 6. Connect to your router's web interface using a web browser. Your computer must be connected to your wireless network. Enter the IP address of the wireless router in the browser toolbar. 7. If required, enter the user name and password. (By default, Linksys routers typically use "admin" for the user name and "admin" for the password.) Wireless-G IP Phone 10
-
 1
1 -
2
-
3
-
4
-
5
-
6
-
7
-
8
-
 9
9 -
 10
10 -
 11
11 -
 12
12 -
 13
13 -
 14
14 -
 15
15 -
 16
16 -
 17
17 -
 18
18 -
 19
19 -
20
-
21
-
22
-
23
-
24
-
25
-
26
-
27
-
28
-
29
-
30
-
31
-
32
-
33
-
34
-
35
-
36
-
37
-
38
-
39
-
40
-
41
-
42
-
43
-
44
-
45
-
46
-
47
-
48
-
49
-
50
-
51
-
52
-
53
-
54
-
55
-
56
 |
 |
