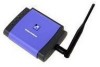
Linksys WPS11 User Guide - Page 16
Click the TCP/IP tab - default ip address
 |
UPC - 745883551804
View all Linksys WPS11 manuals
Add to My Manuals
Save this manual to your list of manuals |
Page 16 highlights
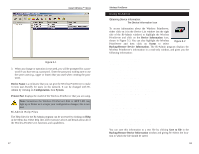
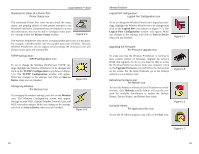
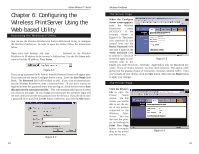
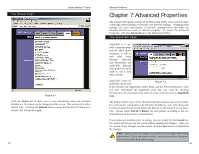
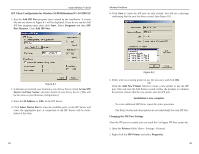
The TCP/IP Page Instant Wireless™ Series Wireless PrintServer The Wireless Page Figure 6-5 Click the TCP/IP tab to view or change the TCP/IP values of the Wireless PrintServer. If you are using DHCP to assign IP addresses, select DHCP Client. By default, DHCP is enabled. If you need to assign the Wireless PrintServer a Fixed IP Address (also known as Static IP Address), select this option, and enter the appropriate values under Device IP Address, Subnet Mask, and Gateway IP Address. To find your Gateway's IP address, consult your Gateway's documentation. The Device IP Address and Subnet Mask are the same as those of any PC connected to the network. If you change the Wireless PrintServer's IP address, make sure you that you reconnect to the Wireless PrintServer using that new IP address. Otherwise, you will not be communicating with the Wireless PrintServer. The Gateway IP Address is not necessary for using the PrintServer. Under the Connection settings, you can set how long you want the Wireless PrintServer to delay between attempting connections to the network. You can also specify the number of times that the Wireless PrintServer will attempt to make a connection. Enter your chosen values in the boxes provided. If you want to reset the settings for this screen, you can click the Retrieve Defaults button to return to the factory default settings. If you make any mistakes prior to saving, you can simply hit the Cancel button, which will exit the screen without making any changes. 25 Figure 6-6 Click the Wireless tab to allow you to change information about the Wireless PrintServer. You can configure the SSID, Channel Number, and Network Type. You can also turn on or off the WEP data encryption feature, as well as choose either 64-bit or 128-bit data encryption. Clicking the Retrieve Defaults button causes the Wireless PrintServer to retrieve the factory default settings. 26
-
 1
1 -
2
-
3
-
4
-
5
-
6
-
7
-
8
-
9
-
10
-
 11
11 -
 12
12 -
 13
13 -
 14
14 -
 15
15 -
 16
16 -
 17
17 -
 18
18 -
 19
19 -
 20
20 -
 21
21 -
22
-
23
-
24
-
25
-
26
-
27
-
28
-
29
-
30
-
31
 |
 |
