Linksys WPS11 User Guide - Page 19
Abort Print Job if Error - support
 |
UPC - 745883551804
View all Linksys WPS11 manuals
Add to My Manuals
Save this manual to your list of manuals |
Page 19 highlights
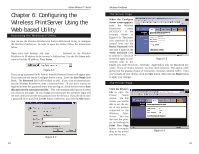
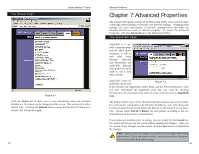
Instant Wireless™ Series The NetBEUI Page Click the NetBEUI tab to view or change the NetBEUI connection settings of the Wireless PrintServer. Enter the name of the domain that you want the Wireless PrintServer associ- ated with in the Domain Name box. If you are unsure of Figure 7-4 the Domain Name, you can find it out by looking on any computer already on the network. In Windows 95, 98 and NT, right-click Network Neighborhood and select Properties. Under the Identification tab, there will be listed that computer's name, and the Domain or Workgroup to which it is connected. For Windows Millennium and 2000, right-click My Network Places. Then right-click Local Area Connection and choose Properties. Then right-click TCP/IP and choose Properties. The Domain name will appear under Workgroup. For Windows XP, click Start and Control Panel. Click Performance and Maintenance and then the System icon. Click the Computer Name tab and then the Change button. The screen will show the Workgroup name. If you want the Wireless PrintServer to be connected to that same Domain, enter that Domain name here (not applicable to Windows XP). If no Domain name exists there, you will use the Workgroup name from that window. Under Options, you can also specify the Response Time that you prefer for the Wireless PrintServer. This is the amount of time (measured in seconds) that the Wireless PrintServer will wait for a response from the network before "timing out". You also have the option to Abort Print Job if Error. Selecting Yes here will terminate the printing if there is an error of any kind. If you select No, print jobs that have errors will be sent to the printer, but may not print properly. If you make any mistakes prior to saving, you can simply hit the Cancel button, which will let you exit the screen without making any changes. Once you are certain of any changes you have made, click the Save button to implement the changes. Note: Linksys does not provide technical support for the NetBEUI protocol. 31 Wireless PrintServer The SNMP Page Figure 7-5 Click the SNMP tab to view or change the SNMP settings of the Wireless PrintServer. The Wireless PrintServer supports SNMP (Simple Network Management Protocol). This allows network supervisors to monitor and control the Wireless PrintServer using network management platforms such as HP OpenView, IBM SystemView, etc. The appropriate MIB file must be imported into your SNMP management program using the Import-Compile command. Check your management program for details on this procedure. The MIB file is provided in the Mib folder on the CD-ROM. The name of the file is Mib1p.mib. Note: Linksys does not provide technical support for SNMP management. 32
-
 1
1 -
2
-
3
-
4
-
5
-
6
-
7
-
8
-
9
-
10
-
11
-
12
-
13
-
 14
14 -
 15
15 -
 16
16 -
 17
17 -
 18
18 -
 19
19 -
 20
20 -
 21
21 -
 22
22 -
 23
23 -
 24
24 -
25
-
26
-
27
-
28
-
29
-
30
-
31
 |
 |
