MSI Z77 User Guide - Page 99
MS-7751, Copy all the contents from \\Storage\Intel\PCH 7\f6flpy-x86 or f6flpy-x64 to a, Please follow
 |
View all MSI Z77 manuals
Add to My Manuals
Save this manual to your list of manuals |
Page 99 highlights
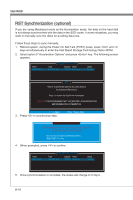
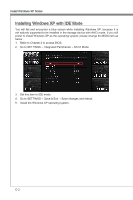
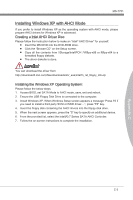
Appendix C MS-7751 Installing Windows XP with AHCI Mode If you prefer to install Windows XP as the operating system with AHCI mode, please prepare AHCI drivers for Windows XP in advanced. Creating a Intel AHCI Driver Disc Please follow the instruction below to make an "Intel® AHCI Driver" for yourself. ■ Insert the MSI DVD into the DVD-ROM drive. ■ Click the "Browse CD" on the Setup screen. ■ Copy all the contents from \\Storage\Intel\PCH 7\f6flpy-x86 or f6flpy-x64 to a formatted floppy diskette. ■ The driver diskette is done. Important You can download the driver from http://download3.msi.com/files/downloads/dvr_exe/intel7x_rst_floppy_mb.zip Installing the Windows XP Operating System: Please follow the below steps: 1. Access BIOS, set SATA Mode to AHCI mode, save, exit and reboot. 2. Ensure the USB Floppy Disk Drive is connected to the computer. 3. Install Windows XP. When Windows Setup screen appears a message "Press F6 if you need to install a third party SCSI or RAID driver....", press "F6" key. 4. Insert the floppy disk containing the AHCI drivers into the floppy disk drive. 5. When the next screen appears, press the "S" key to specify an additional device. 6. From the provided list, select the Intel(R) 7 Series SATA AHCI Controller. 7. Follow the on-screen instructions to complete the installation. C-3
-
 1
1 -
2
-
3
-
4
-
5
-
6
-
7
-
8
-
9
-
10
-
11
-
12
-
13
-
14
-
15
-
16
-
17
-
18
-
19
-
20
-
21
-
22
-
23
-
24
-
25
-
26
-
27
-
28
-
29
-
30
-
31
-
32
-
33
-
34
-
35
-
36
-
37
-
38
-
39
-
40
-
41
-
42
-
43
-
44
-
45
-
46
-
47
-
48
-
49
-
50
-
51
-
52
-
53
-
54
-
55
-
56
-
57
-
58
-
59
-
60
-
61
-
62
-
63
-
64
-
65
-
66
-
67
-
68
-
69
-
70
-
71
-
72
-
73
-
74
-
75
-
76
-
77
-
78
-
79
-
80
-
81
-
82
-
83
-
84
-
85
-
86
-
87
-
88
-
89
-
90
-
91
-
92
-
93
-
 94
94 -
 95
95 -
 96
96 -
 97
97 -
 98
98 -
 99
99 -
 100
100
 |
 |