Mackie PPM1008 Owner's Manual - Page 11
POWER AMP MODE SWITCH, Stereo Mains, Mains/Monitor 1, Monitor 1/Monitor 2, VENTILATION and REAR - powered mixer manual
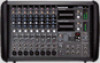 |
View all Mackie PPM1008 manuals
Add to My Manuals
Save this manual to your list of manuals |
Page 11 highlights
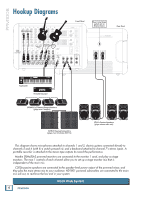
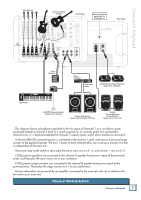
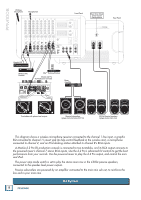
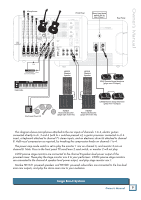
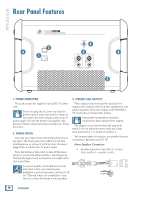
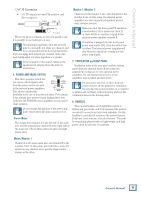
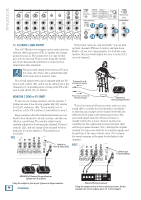
Owner's Manual 1/4" TS Connection • 1/4" TS outputs are wired Tip positive, and Sleeve negative. SLEEVE SLEEVE TIP TIP TIP SLEEVE These two types of outputs are wired in parallel, and it is possible to use both types at once. The minimum impedance that the powered mixers can handle is 4 ohms per channel, and we recommend that you do not go below this. If you are using both outputs per channel, make sure WERED MIXEeaRch loudspeaker is 8 ohms impedance or greater. Do not connect or disconnect cables to the speaker-level outputs when the mixer is powered on. 4. POWER AMP MODE SWITCH This three-position switch lets you choose which signal paths from the mixer section are sent to the internal power amplifiers. This allows considerable flexibility in the use of the powered mixer. For example, if you already have powered main loudspeakers, you could use the PPM1008 power amplifiers to run passive stage monitors. Do not change the position of the power amp mode switch when the mixer is powered on. Stereo Mains The output from channel A is the left side of the main mix, and the output from channel B is the right side of the main mix. Choose this position to play a straight stereo show. Monitor 1/Monitor 2 Channel A is the monitor 1 mix, and channel B is the monitor 2 mix. In this setup, the internal power amplifiers are powering two independent passive stage monitor systems. Make sure that the front panel FX send/mon 2 send switch [51] is pressed in (mon 2) , or there will be no monitor 2 signal to the internal power amplifier channel B. If anything is plugged into the front panel power amp inputs [20], then this switch has no effect. The internal power amplifier will play whatever signals are coming into the power amp inputs. 5. VENTILATION and REAR PANEL Ventilation holes in the rear panel and the bottom panel allow the internal fans to flow breezy and minty-fresh cooling air over the internal power amplifiers. Do not obstruct these holes, or the amplifiers may overheat and shut down. Do not remove the feet, as these keep the powered mixer off the ground for ventilation. Do not place the powered mixer on a carpeted or similar soft and fuzzy surface that may obstruct the ventilation holes in the bottom panel. 6. HANDLES These metal handles are delightfully modern in styling and good looks, and truly represent the perfect accessory to accent your busy work schedule. Use the handles to carefully lift and move the powered mixer. Better yet, have someone else lift it for you. They will be remarkably pleased with its light weight, and high power, ideal for all sorts of road trips. Mains/Monitor 1 OUTPUT POWER: @ 4 OHMS, 800 WATTS PEAK PER CH MINIMUM LOAD: 4 OHMS PER CHANNEL Channel A is the mono main mix, and channel B is the monitor 1 mix. In this setup, you could run a mono PA system on one channel, and a passive stage monitor system on the other. Owner's Manual 11
-
 1
1 -
2
-
3
-
4
-
5
-
 6
6 -
 7
7 -
 8
8 -
 9
9 -
 10
10 -
 11
11 -
 12
12 -
 13
13 -
 14
14 -
 15
15 -
 16
16 -
17
-
18
-
19
-
20
-
21
-
22
-
23
-
24
-
25
-
26
-
27
-
28
-
29
-
30
-
31
-
32
 |
 |
