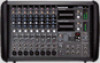
Mackie PPM1008 Owner's Manual - Page 21
Hz Rumble Reduction Switch, Main Mix Meters, Monitor 1 Master Graphic Eq, Fx To Mon 1, Monitor 1 - problems
 |
View all Mackie PPM1008 manuals
Add to My Manuals
Save this manual to your list of manuals |
Page 21 highlights
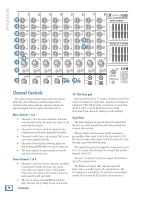
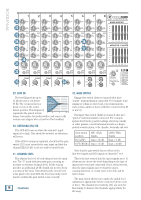
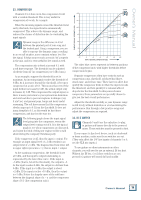
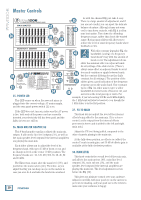
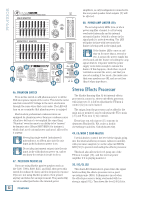
Owner's Manual The control does not affect the monitor 1 output [17], monitor 2 output [15], or the internal power amp if it is playing a monitor. (For stage monitor work, it is good that the main mix level does not affect the monitor outputs, so they can be set up nicely and stay that way.) The main mix signals are off with the level fully down, the "U" marking is unity gain, and fully up provides 12 dB of additional gain. This additional gain will typically never be needed, but once again, it's nice to know it's there. The level control is stereo, as it affects both the left and right of the main mix equally. This is the control to turn down at the end of the song when you want "The Great Fade-Out." 39. 100 Hz RUMBLE REDUCTION SWITCH This switch is used to reduce the level of the frequency range below 100 Hz. It operates only on the mono channel 1 to 6 mix, not the stereo channel mix. Engage it to remove excess low-end from the mic inputs while still keeping the full-range stereo inputs full of meaty low-end. Use this to reduce the amount of low frequency problems such as mic handling, stage rumble, bangs and thumps in your main mix. case you over-do it and take the levels into overload. As with the channel EQ, just take it easy. Having many sliders will help you reduce the level of frequency bands in the stage monitors that cause feedback from nearby microphones. 42. FX TO MON 1 This knob lets you adjust how much of the internal effects is added to the mono monitor 1 mix. (The output from the internal effects processor is stereo, summed to mono and added to the mono monitor 1 mix.) Adjust the FX level being added, compared to the other channels playing in the monitor 1 mix. At the fully-down position, no effects are added, the center U mark is unity gain, and there is 10 dB of effects gain at the fully clockwise position. 43. MONITOR 1 LEVEL This knob controls the level of the monitor 1 mix, and affects the monitor 1 meter [45], mon 1 line-level outputs [17], and the monitor 1 speaker-level output if the internal amplifier is playing the monitor 1 mix. The level adjustment occurs before the monitor 1 EQ [41]. This switch is the audio-electronic equivalent of taking anti-gas medication. It relieves low-end rumble, and the whole room sounds better. 40. MAIN MIX METERS Developed from a harmless ex-NASA hamster hypnotizer*, these stereo meters show the level of the left and right main mix, after it has passed through the main level [38] and graphic EQ [36]. The top LEDs are marked OL (overload), and you should adjust the levels to avoid these coming on too often, if at all. Please remember: Audio meter displays are just tools to help assure you that your levels are "in the ballpark." You don't have to stare at them (unless you want to). *Tests have shown that it is possible to send hamsters safely to Mars and back under deep hypnosis. This gives you ultimate control over your monitor 1 stage monitors. Adjust it carefully, with your good eye on the meter [45] to check against overloading, and to make sure your band are happy with the levels. The control does not affect the main mix level. The monitor 1 mix signals are off with the level fully down, the "U" marking is unity gain, and fully up provides 12 dB of additional gain. 44. 100 Hz RUMBLE REDUCTION SWITCH This switch is used to reduce the level of the frequency range below 100 Hz from the monitor 1 mix. It only affects the monitor 1 mix, and does not affect any effects being added from the internal FX processor. Use this to reduce the amount of low frequency problems such as mic handling, stage rumble, bangs and thumps that might affect the stage monitors. 41. MONITOR 1 MASTER GRAPHIC EQ This 9-band, constant-Q, graphic equalizer adjusts the monitor 1 mix output. It affects the line-level monitor 1 outputs [17], and the monitor 1 speaker-level output if the internal amplifier is playing the monitor 1 mix. Additionally, utilize this switch to reduce low frequency feedback through the monitors. This switch should almost always be engaged unless the performing artists request more low-end from the monitors. 45. MONITOR 1 METER Each slider allows you to adjust the level of its This meter shows you the level of the monitor 1 mix, frequency band, with up to 15 dB of boost or cut, and after it has passed through the monitor 1 level [43] and no change in level at the center (0 dB) position. The graphic EQ [41]. frequency bands are: 63, 125, 250, 500, 1k, 2k, 4k, 8k and 16 kHz. The top LED is marked OL (overload), and you should adjust the levels to avoid this coming on too often, if at all. The EQ section comes after the monitor 1 level [43], and just before the monitor 1 meter [45]. Therefore, as Owner's Manual 21 you adjust the EQ, you can keep an eye on the meter in
-
 1
1 -
2
-
3
-
4
-
5
-
6
-
7
-
8
-
9
-
10
-
11
-
12
-
13
-
14
-
15
-
 16
16 -
 17
17 -
 18
18 -
 19
19 -
 20
20 -
 21
21 -
 22
22 -
 23
23 -
 24
24 -
 25
25 -
 26
26 -
27
-
28
-
29
-
30
-
31
-
32
 |
 |