Mackie PPM1008 Owner's Manual - Page 23
Fx Send Post/mon 2 Send Pre, Fx Send Post, Mon 2 Send Pre, Preset Display, Preset Selector, Tap - new
 |
View all Mackie PPM1008 manuals
Add to My Manuals
Save this manual to your list of manuals |
Page 23 highlights
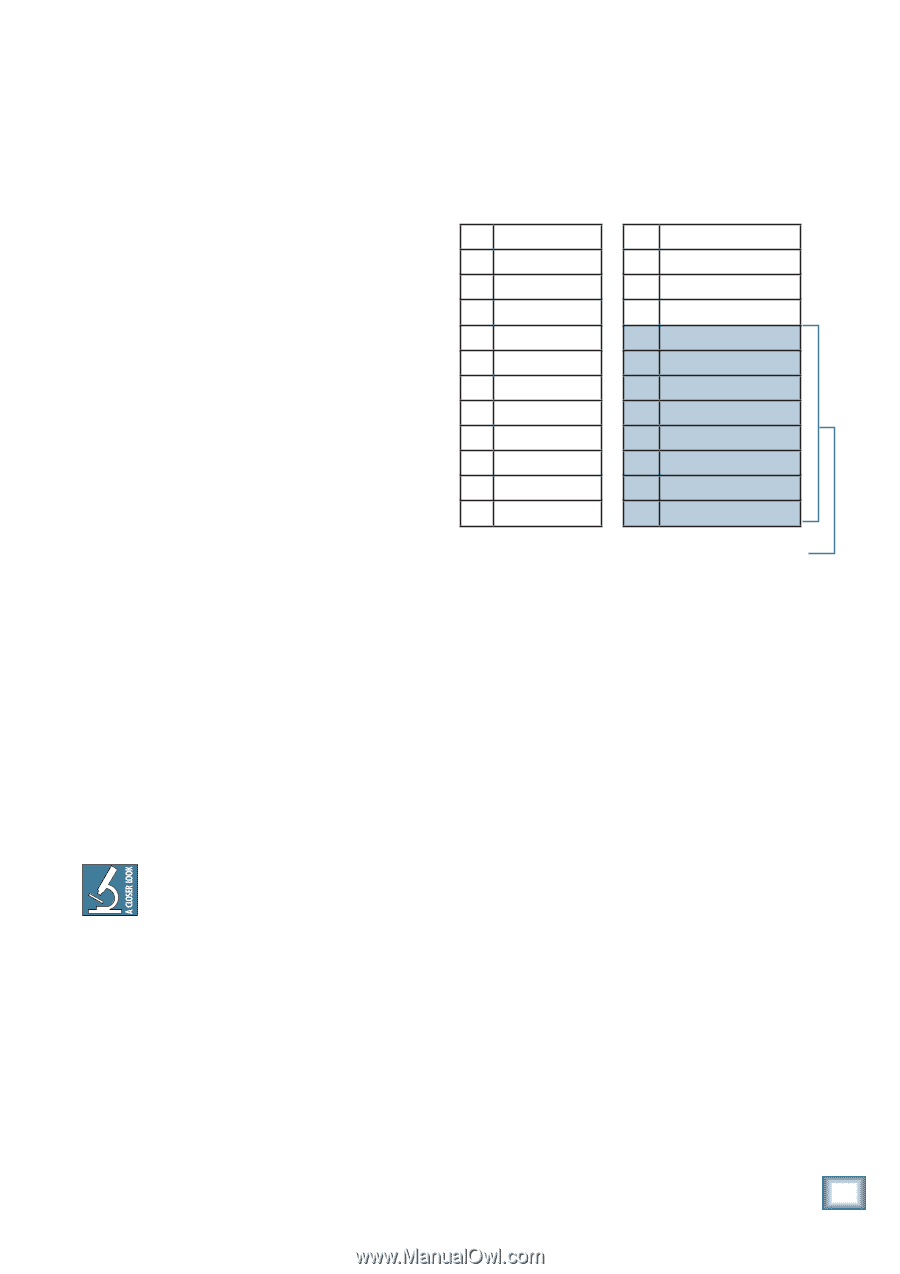
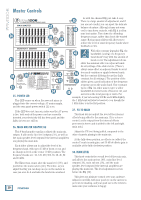
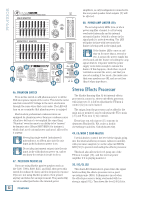
Owner's Manual The signals going into the processor are affected by the channel FX/mon 2 controls [22], and the channel level controls [31] (if the FX send/mon 2 send switch [51] is out (post)). Check the LED if you alter these controls. 51. FX SEND (POST)/MON 2 SEND (PRE) This switch lets you choose which signal path is used to feed the internal effects processor (and the FX/mon 2 output [15]) as follows: FX SEND (POST) Choose this (out) position when you want to use the internal effects processor, or if you want to set up an external processor. The FX/mon 2 control [22] on each channel samples the channel signals after (post) the channel level controls [31]. Any changes to the channel level will also affect the level feeding the internal effects. You can also set up an external effects processor by: 1. Muting the internal effects processor. 2. Connecting the FX/mon 2 output to an external processor. 3. Returning the processed signal back to a free mono or stereo channel line input. MON 2 SEND (PRE) In this position (in), the FX/mon 2 control on each channel samples the channel signals before (pre) the channel level controls. This is ideal for using the FX/mon 2 output to feed a stage monitor 2 setup, or to use the internal power amp to power it (power amp mode switch [4] in the mon 1/mon 2 position). You might want to mute the internal effects processor with the FX mute switch [54]. For more details, please see page 14, or the rather lovely block diagram on page 29. 52. PRESET DISPLAY This display shows the number of the currently selected effects preset, as shown in the list of presets silkscreened to the left of the display. Rotate the preset selector knob to choose a preset. The new preset will be loaded approximately 1/4 of a second after you stop turning the knob, and will be stored into the FX memory after about one second. When the powered mixer is turned on, the FX section will load up the last-used preset. 53. PRESET SELECTOR, TAP DELAY and LED Rotate this endless control to select one of the 24 preset effects. When you stop the rotation, that preset will be loaded and become operational. The current preset number is shown in the display [52]. The different presets are shown in this table and marked on the panel silkscreen. Further details of each preset are shown in Appendix D on page 30. 1 Plate Reverb 2 Vocal Plate 3 Warm Room 4 Bright Room 5 Warm Lounge 6 Small Stage 7 Warm Theater 8 Bright Stage 9 Warm Hall 10 Concert Hall 11 Cathedral 12 Gated Reverb 13 Chorus 14 Chorus + Reverb 15 Doubler 16 Tape Slap 17 Delay 1 Brt 350ms 18 Delay 1 Wrm 300ms 19 Delay 2 Brt 250ms 20 Delay 2 Wrm 200ms 21 Delay 3 Brt 175ms 22 Delay 3 Wrm 150ms 23 Chorus + Dly 300ms 24 Reverb + Dly 200ms The knob also offers a tap delay function for presets 17 to 24. This works as follows: 1. Use the knob to select a preset from 17 to 24. 2. Press the knob in at least two times. The DSP processor will calculate the time delay between the last two pushes, and it will assign this time interval to the echoes of the current digital delay. The minimum tap delay is 50 ms and the maximum is 500 ms. If taps are faster than 50 ms, they will be set to 50 ms. If taps are between 500 ms and 1 second, they will be set to 500 ms. If taps are greater than 1 second apart, they will be ignored. Try again a bit faster. 3. The LED will flash in time with the new tap delay time. 54. INTERNAL FX MUTE When engaged, the internal effects processor is muted at its output, and the adjacent LED will come on. The footswitch connection [16] becomes disabled, and you will not be able to use the footswitch to mute or unmute the effects. If this switch is not engaged, then the internal effects can be muted or unmuted with the footswitch. Congratulations! You've just read about all the features of your powered mixer. Time for a cold one. Owner's Manual 23
-
 1
1 -
2
-
3
-
4
-
5
-
6
-
7
-
8
-
9
-
10
-
11
-
12
-
13
-
14
-
15
-
16
-
17
-
 18
18 -
 19
19 -
 20
20 -
 21
21 -
 22
22 -
 23
23 -
 24
24 -
 25
25 -
 26
26 -
 27
27 -
 28
28 -
29
-
30
-
31
-
32
 |
 |