Marantz PM-11S1 PM-11S1 User Manual - Page 10
Connection Example 2: Basic Connection for 5.1 Multi-Channel Playback Using 3 PM-11S1, ABOUT FCBS,
 |
View all Marantz PM-11S1 manuals
Add to My Manuals
Save this manual to your list of manuals |
Page 10 highlights
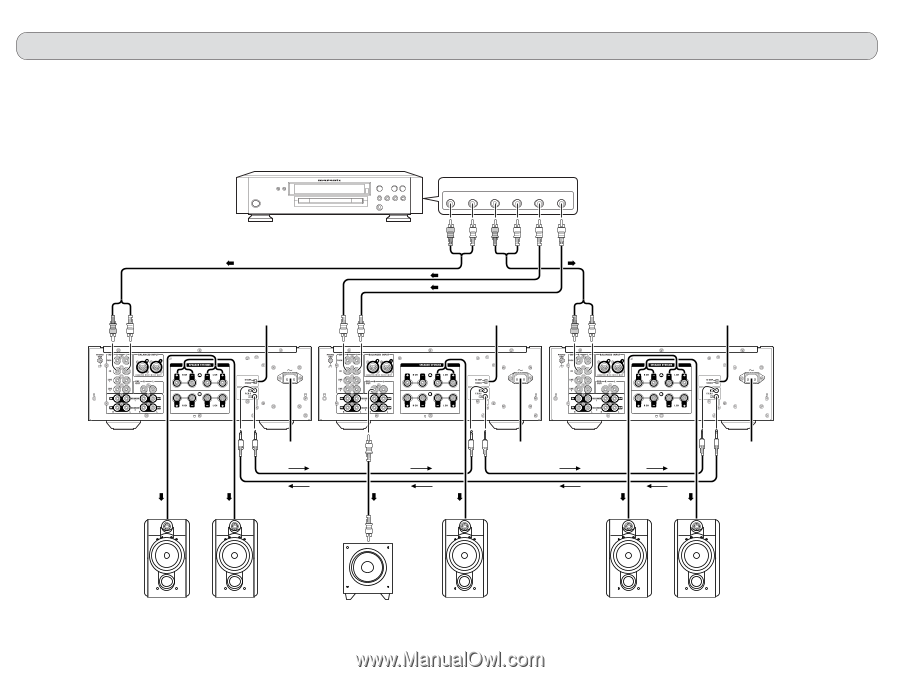
CONNECTIONS Connection Example 2: Basic Connection for 5.1 Multi-Channel Playback Using 3 PM-11S1 The three PM-11S1s are connected by FCBS. For the FCBS connection, prepare 3 portable audio connection cables with monaural ⇔ monaural miniplugs or stereo ⇔ stereo miniplugs as described "ABOUT FCBS" on pg. 15. Set the ID numbers for the PM11S1 units as explained "HOW TO SET ID" on pg. 19. When the PM-11S1 of ID 1 is operated, those of ID 2 and ID 3 will operate in sync. If using an active subwoofer, see the instruction manual that came with the subwoofer for connection and positioning instructions. SACD multi-channel player, etc. FRONT R MULTI CHANNEL AUDIO OUT FRONT L SURROUND R SURROUND L SUB-WOOFER CENTER For front L/R speakers Set PM-11S1 to ID 1. Set SPEAKER A button on front panel in ON position. Set to "STEREO". 3 2 1 3 2 1 AC IN For center speaker or subwoofer Set PM-11S1 to ID 2. Set SPEAKER A button on front panel in ON position. Set PRE OUT button on front panel in ON position. Set to "STEREO". 3 2 1 3 2 1 AC IN For surround speakers Set PM-11S1 to ID 3. Set SPEAKER A button on front panel in ON position. Set to "STEREO". 3 2 1 3 2 1 AC IN To power outlet To power outlet To power outlet To line input jack L CH front speaker R CH front speaker Active subwoofer Front center speaker L CH surround speaker R CH surround speaker 6
-
 1
1 -
2
-
3
-
4
-
 5
5 -
 6
6 -
 7
7 -
 8
8 -
 9
9 -
 10
10 -
 11
11 -
 12
12 -
 13
13 -
 14
14 -
 15
15 -
16
-
17
-
18
-
19
-
20
-
21
-
22
-
23
-
24
-
25
-
26
-
27
 |
 |