Memorex MVUC821 Manual - Page 7
Installation - template
 |
UPC - 749720012732
View all Memorex MVUC821 manuals
Add to My Manuals
Save this manual to your list of manuals |
Page 7 highlights
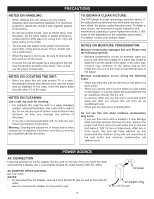
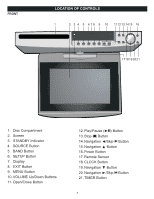
INSTALLATION INSTALLING THE UNIT UNDER A CABINET The suggested mounting position of the unit is under a wall cabinet, but it can be installed under many areas. There should be at least 2-1/2" distance between the unit and the wall to allow for connections and ventilation. IMPORTANT NOTES: • Since the unit is rather heavy, be careful while mounting. • To reduce risk of fire, do not place any heating or cooking appliance beneath the unit, especially while the LCD screen is open. • Mount the unit so that its AC adapter can be plugged directly to a wall outlet. • Do not use a converter or extension cord. • Install the unit as far as possible from a source of noise; i.e., a refrigerator, microwave oven, fluorescent lamp, etc. • Please allow ample space on each side for the speakers. • Keep unit away when drilling to avoid getting wood shavings in the ventilation holes. • Drill from bottom up if there is not enough room in the cabinet. 1 2a Cut the template and place inside the cabinet with the template border marked "FRONT" along the front edge of the cabinet, then use adhesive tape to fix the template. Drill four 1/4" diameter holes as shown on the template. Remove template when finished. 3 Measure the height of the cabinet bottom and overhang. If the cabinet bottom is 1" thick, then the spacers are not necessary, use screws only as shown. 4 If the cabinet bottom is 3/4" thick, then use the spacers turned upwards as shown. 5 If the cabinet bottom is 3/8" to 1/2" thick, then use the spacers turned downwards as shown. 6 With a screwdriver (not an electric screwdriver or drill), fasten the four screws into the spacer holder holes (or fasten the screw to your set if spacers were not needed). Start screwing at two opposite corners of the unit for better support. Push the release latch, pull down the screen to a maximum of 180° and rotate. 6
-
 1
1 -
 2
2 -
 3
3 -
 4
4 -
 5
5 -
 6
6 -
 7
7 -
 8
8 -
 9
9 -
 10
10 -
 11
11 -
 12
12 -
13
-
14
-
15
-
16
-
17
-
18
-
19
-
20
-
21
-
22
-
23
-
24
-
25
-
26
-
27
-
28
-
29
-
30
-
31
-
32
-
33
-
34
-
35
-
36
-
37
-
38
-
39
-
40
-
41
-
42
-
43
-
44
-
45
-
46
-
47
-
48
-
49
-
50
-
51
-
52
-
53
-
54
-
55
-
56
-
57
-
58
-
59
 |
 |
