Miele K 2601 Vi Operating and Installation instructions - Page 30
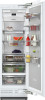
Pushing the appliance into the niche, to the refrigeration appliance
 |
View all Miele K 2601 Vi manuals
Add to My Manuals
Save this manual to your list of manuals |
Page 30 highlights
*INSTALLATION* Installation Pushing the appliance into the niche Then push the appliance into the niche, taking care not to damage the electrical connection! If you are installing several refrigeration appliances side by side, now secure the appliances to one another (see the installation instructions for the side-by-side installation kit). To ensure that the refrigeration appliance can then be aligned correctly, the toe-kick ventilation grille must be removed from the appliance toe-kick: Affix edge protection to the adjacent cabinet fronts. Insert the plug connector at the back of the refrigeration appliance (see "Installation - Electrical connection"). Insert the plug into the electrical socket. The electrical socket must be close to the refrigeration appliance and easily accessible. Carefully guide a flat-head screwdriver through the toe-kick ventilation grille on both sides and use it to push the internal plastic latches outwards to release the toekick ventilation grille. Place the toe-kick ventilation grille to one side. Risk of damage due to electrical overload. If the refrigeration appliance is electrically overloaded, this can cause a short circuit and thus damage your refrigeration appliance. When you install appliances side by side, each refrigeration appliance must have its own separate electrical socket. Tip: Secure the power cord to prevent it from becoming caught by tying a piece of string to the middle of the cord and as the refrigeration appliance is being pushed into the niche, pull the cord forward underneath the appliance. 30
-
 1
1 -
2
-
3
-
4
-
5
-
6
-
7
-
8
-
9
-
10
-
11
-
12
-
13
-
14
-
15
-
16
-
17
-
18
-
19
-
20
-
21
-
22
-
23
-
24
-
 25
25 -
 26
26 -
 27
27 -
 28
28 -
 29
29 -
 30
30 -
 31
31 -
 32
32 -
 33
33 -
 34
34 -
 35
35 -
36
-
37
-
38
-
39
-
40
-
41
-
42
-
43
-
44
-
45
-
46
-
47
-
48
-
49
-
50
-
51
-
52
-
53
-
54
-
55
-
56
-
57
-
58
-
59
-
60
-
61
-
62
-
63
-
64
-
65
-
66
-
67
-
68
-
69
-
70
-
71
-
72
-
73
-
74
-
75
-
76
-
77
-
78
-
79
-
80
-
81
-
82
-
83
-
84
-
85
-
86
-
87
-
88
-
89
-
90
-
91
-
92
-
93
-
94
-
95
-
96
-
97
-
98
-
99
-
100
-
101
-
102
-
103
-
104
-
105
-
106
-
107
-
108
 |
 |
