NEC LT280 LT280/LT38 UM - Page 15
Rear, Bottom, PC Card Eject Button - power supply
 |
UPC - 050927250569
View all NEC LT280 manuals
Add to My Manuals
Save this manual to your list of manuals |
Page 15 highlights
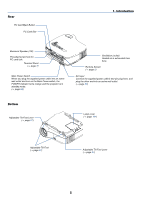
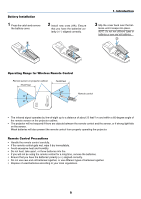
Rear PC Card Eject Button PC Card Slot Monaural Speaker (1W) Threaded screw hole for PC card lock Terminal Panel (→ page 7) SELECT 3D REFORM AUTO ADJUST SOURCE PC CARD USB COMPONENT IN S-VIDEO Y IN VIDEO Cb/Pb IN Cr/Pr L/MONAOUDIO IN R LAN AUDIO IN AUDIO OUT COMPUTER COMPUTER 1 IN 3 IN MONITOR OUT ON/STAND BY POWSETRATLUASMPPC CARD COMPUTER 2 IN PC CONTROL Main Power Switch When you plug the supplied power cable into an active wall outlet and turn on the Main Power switch, the POWER indicator turns orange and the projector is in standby mode. (→ page 24) 1. Introduction Ventilation (outlet) Heated air is exhausted from here. Remote Sensor (→ page 9) AC Input Connect the supplied power cable's two-pin plug here, and plug the other end into an active wall outlet. (→ page 23) Bottom Adjustable Tilt Foot Lever (→ page 27) Lamp cover (→ page 104) Adjustable Tilt Foot (→ page 27) Adjustable Tilt Foot Lever (→ page 27) 5
-
 1
1 -
2
-
3
-
4
-
5
-
6
-
7
-
8
-
9
-
 10
10 -
 11
11 -
 12
12 -
 13
13 -
 14
14 -
 15
15 -
 16
16 -
 17
17 -
 18
18 -
 19
19 -
 20
20 -
21
-
22
-
23
-
24
-
25
-
26
-
27
-
28
-
29
-
30
-
31
-
32
-
33
-
34
-
35
-
36
-
37
-
38
-
39
-
40
-
41
-
42
-
43
-
44
-
45
-
46
-
47
-
48
-
49
-
50
-
51
-
52
-
53
-
54
-
55
-
56
-
57
-
58
-
59
-
60
-
61
-
62
-
63
-
64
-
65
-
66
-
67
-
68
-
69
-
70
-
71
-
72
-
73
-
74
-
75
-
76
-
77
-
78
-
79
-
80
-
81
-
82
-
83
-
84
-
85
-
86
-
87
-
88
-
89
-
90
-
91
-
92
-
93
-
94
-
95
-
96
-
97
-
98
-
99
-
100
-
101
-
102
-
103
-
104
-
105
-
106
-
107
-
108
-
109
-
110
-
111
-
112
-
113
-
114
-
115
-
116
-
117
-
118
-
119
-
120
-
121
-
122
-
123
-
124
-
125
-
126
-
127
-
128
-
129
-
130
-
131
-
132
-
133
 |
 |
