Netgear DGN2200v1 DGN2200 User Manual - Page 154
Intel PRO/100VE Network Connection, VPN Client Authentication
 |
View all Netgear DGN2200v1 manuals
Add to My Manuals
Save this manual to your list of manuals |
Page 154 highlights
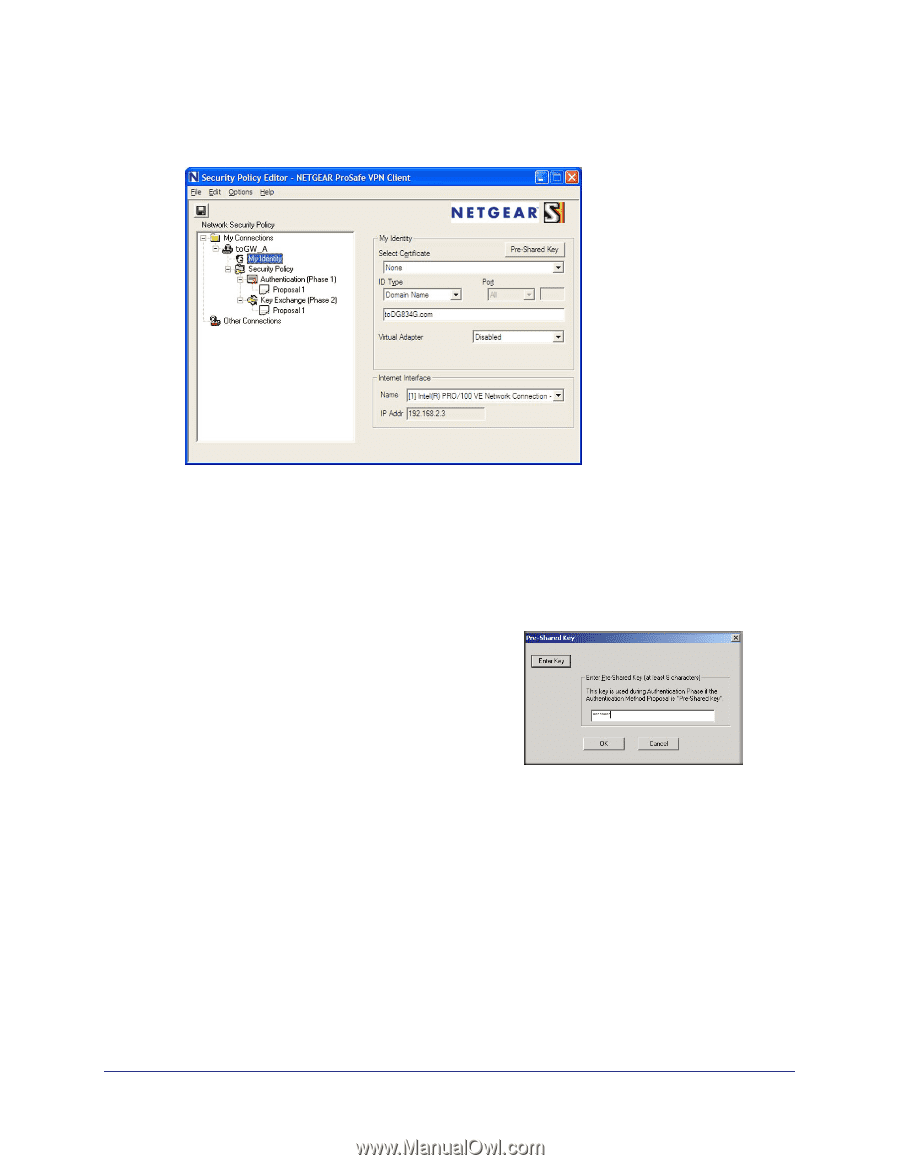
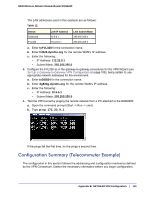
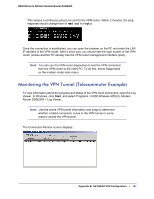
N300 Wireless ADSL2+ Modem Router DGN2200 a. In the Network Security Policy list on the left side of the Security Policy Editor window, click My Identity. b. Select None in the Select Certificate field. c. Select Domain Name in the ID Type field, and enter toGW_A.com (in this example). Select Disabled in the Virtual Adapter field. d. In the Internet Interface section, select Intel PRO/100VE Network Connection (in this example; your Ethernet adapter might be different) in the Name field, and then enter 192.168.2.3 (in this example) in the IP Addr field. e. Click the Pre-Shared Key button. f. In the Pre-Shared Key screen, click Enter Key. Enter the DGN2200's pre-shared key and click OK. In this example, 12345678 is entered, though the screen shows asterisks. This field is case-sensitive. 5. Configure the VPN Client Authentication Proposal. In this step, you provide the type of encryption (DES or 3DES) to be used for this connection. This selection has to match your selection in the VPN router configuration. a. In the Network Security Policy list on the left side of the Security Policy Editor window, expand the Security Policy heading by double-clicking its name or clicking the + symbol. 154 | Appendix B. NETGEAR VPN Configuration
-
 1
1 -
2
-
3
-
4
-
5
-
6
-
7
-
8
-
9
-
10
-
11
-
12
-
13
-
14
-
15
-
16
-
17
-
18
-
19
-
20
-
21
-
22
-
23
-
24
-
25
-
26
-
27
-
28
-
29
-
30
-
31
-
32
-
33
-
34
-
35
-
36
-
37
-
38
-
39
-
40
-
41
-
42
-
43
-
44
-
45
-
46
-
47
-
48
-
49
-
50
-
51
-
52
-
53
-
54
-
55
-
56
-
57
-
58
-
59
-
60
-
61
-
62
-
63
-
64
-
65
-
66
-
67
-
68
-
69
-
70
-
71
-
72
-
73
-
74
-
75
-
76
-
77
-
78
-
79
-
80
-
81
-
82
-
83
-
84
-
85
-
86
-
87
-
88
-
89
-
90
-
91
-
92
-
93
-
94
-
95
-
96
-
97
-
98
-
99
-
100
-
101
-
102
-
103
-
104
-
105
-
106
-
107
-
108
-
109
-
110
-
111
-
112
-
113
-
114
-
115
-
116
-
117
-
118
-
119
-
120
-
121
-
122
-
123
-
124
-
125
-
126
-
127
-
128
-
129
-
130
-
131
-
132
-
133
-
134
-
135
-
136
-
137
-
138
-
139
-
140
-
141
-
142
-
143
-
144
-
145
-
146
-
147
-
148
-
 149
149 -
 150
150 -
 151
151 -
 152
152 -
 153
153 -
 154
154 -
 155
155 -
 156
156 -
 157
157 -
 158
158 -
 159
159 -
160
-
161
-
162
-
163
-
164
-
165
-
166
-
167
 |
 |