Netgear FS509 Installation Guide - Page 30
Installing a Switch, Installing the Switch on a Flat Surface
 |
View all Netgear FS509 manuals
Add to My Manuals
Save this manual to your list of manuals |
Page 30 highlights
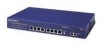
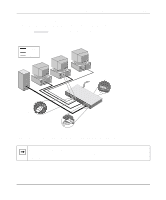
Installation Guide for the Model FS509 Fast Ethernet Switch Call your reseller or customer support in your area if there are any wrong, missing, or damaged parts. Refer to the enclosed Customer Support Information Card for more information. Keep the carton, including the original packing materials. Use them to repack the switch if you need to return it for repair. To qualify for product updates and product warranty registration, fill in the Warranty & Owner Registration Card within 30 days of purchase and return it to NETGEAR, Inc. Installing a Switch To install a switch on a desktop, on another flat surface, or in a rack: 1. Unpack the switch. 2. Choose a location near the devices to be connected and close to an electrical outlet. 3. Proceed to "Installing the Switch on a Flat Surface" or "Installing the Switch in a Rack." Installing the Switch on a Flat Surface To install the switch on a desktop or any other flat surface: 1. Install self-adhesive rubber footpads on the bottom of the switch. Peel off the protective backing from the rubber pads and apply one at each marked location on the bottom of the switch. 2. Set the switch on a desktop or any other flat surface. For proper ventilation, make sure that the switch has at least 2 inches of space on each side and 5 inches of space at the back. It is very important that the fans located in the rear panel are not blocked. Caution: Restricted airflow could cause overheating of the components. 4-2 Installation
-
 1
1 -
2
-
3
-
4
-
5
-
6
-
7
-
8
-
9
-
10
-
11
-
12
-
13
-
14
-
15
-
16
-
17
-
18
-
19
-
20
-
21
-
22
-
23
-
24
-
 25
25 -
 26
26 -
 27
27 -
 28
28 -
 29
29 -
 30
30 -
 31
31 -
 32
32 -
 33
33 -
 34
34 -
 35
35 -
36
-
37
-
38
-
39
-
40
-
41
-
42
-
43
-
44
-
45
-
46
-
47
-
48
-
49
-
50
 |
 |