Netgear FS509 Installation Guide - Page 31
Installing the Switch in a Rack, 1 Phillips screwdriver
 |
View all Netgear FS509 manuals
Add to My Manuals
Save this manual to your list of manuals |
Page 31 highlights
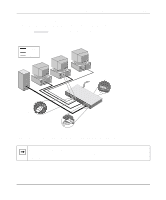
Installation Guide for the Model FS509 Fast Ethernet Switch Installing the Switch in a Rack To mount the switch in a standard 19-inch equipment rack, you need these tools and materials: • Two mounting brackets supplied from the Rack Mount Kit • Eight screws supplied from the Rack Mount Kit to attach the mounting brackets to the switch • Four screws and nylon washers supplied from the Rack Mount Kit to attach the mounting brackets to the rack • #1 Phillips screwdriver • #2 Phillips screwdriver To install the switch in a rack: 1. Attach the mounting brackets to the sides of the switch as illustrated in Figure 4-1. Hold a mounting bracket against each side of the switch and align the countersunk screw holes in the bracket with the bracket mounting holes in the switch. 2. Insert the screws provided in the Rack Mount Kit through each bracket and into the bracket mounting holes in the switch. 3. Using a #1 Phillips screwdriver, tighten the screws to secure each bracket. 4. Hold the switch with the mounting holes in the brackets aligned with the holes in the rack. Figure 4-1. 8945FA Attaching Mounting Brackets to the Model FS509 Switch Installation 4-3
-
 1
1 -
2
-
3
-
4
-
5
-
6
-
7
-
8
-
9
-
10
-
11
-
12
-
13
-
14
-
15
-
16
-
17
-
18
-
19
-
20
-
21
-
22
-
23
-
24
-
25
-
 26
26 -
 27
27 -
 28
28 -
 29
29 -
 30
30 -
 31
31 -
 32
32 -
 33
33 -
 34
34 -
 35
35 -
 36
36 -
37
-
38
-
39
-
40
-
41
-
42
-
43
-
44
-
45
-
46
-
47
-
48
-
49
-
50
 |
 |
