Netgear GS305EPP User Manual - Page 15
Set up a fixed IP address for the switch
 |
View all Netgear GS305EPP manuals
Add to My Manuals
Save this manual to your list of manuals |
Page 15 highlights
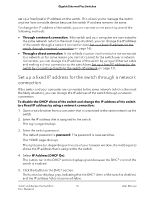
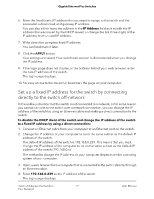
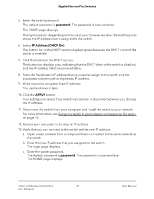
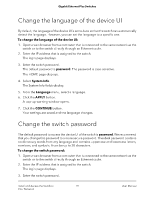
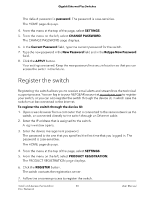
Gigabit Ethernet Plus Switches If the NETGEAR Switch Discovery Tool icon is in the Dock of your Mac or on the desktop of your Windows-based computer, click or double-click the icon to open the program. The initial page displays a menu and a button. 8. From the Choose a connection menu, select the network connection that allows the NSDT to access the switch. 9. Click the Start Searching button. The NSDT displays a list of switches that it discovers on the selected network. For each switch, the tool displays the IP address. 10. To access the device UI of the switch, click the ADMIN PAGE button. The login page of the device UI opens. 11. Enter the switch password. The default password is password. The password is case-sensitive. The HOME page displays. The right pane (or, depending on the size of your browser window, the middle pane) shows the IP address that is assigned to the switch. Tip: You can copy and paste the IP address into a new shortcut or bookmark it for quick access on your computer or mobile device. However, if you restart the switch, a dynamic IP address (assigned by a DHCP server) might change the IP address, and the bookmark might no longer link to the login page for the switch. When you restart the switch, you must repeat this procedure so that you can discover the new IP address of the switch in the network and update your bookmark accordingly. You can also set up a fixed (static) IP address for the switch (see Set up a fixed IP address for the switch on page 15 ) to make sure that the new bookmark always links to the login page for the switch, even after you restart the switch. Set up a fixed IP address for the switch By default, the switch receives an IP address from a DHCP server (or a router that functions as a DHCP server) in your network. However, the DHCP server might not always issue the same IP address to the switch. For easy access to the switch device UI, you can Install and Access the Switch in 15 Your Network User Manual
-
 1
1 -
2
-
3
-
4
-
5
-
6
-
7
-
8
-
9
-
 10
10 -
 11
11 -
 12
12 -
 13
13 -
 14
14 -
 15
15 -
 16
16 -
 17
17 -
 18
18 -
 19
19 -
 20
20 -
21
-
22
-
23
-
24
-
25
-
26
-
27
-
28
-
29
-
30
-
31
-
32
-
33
-
34
-
35
-
36
-
37
-
38
-
39
-
40
-
41
-
42
-
43
-
44
-
45
-
46
-
47
-
48
-
49
-
50
-
51
-
52
-
53
-
54
-
55
-
56
-
57
-
58
-
59
-
60
-
61
-
62
-
63
-
64
-
65
-
66
-
67
-
68
-
69
-
70
-
71
-
72
-
73
-
74
-
75
-
76
-
77
-
78
-
79
-
80
-
81
-
82
-
83
-
84
-
85
-
86
-
87
-
88
-
89
-
90
-
91
-
92
-
93
-
94
 |
 |
