Netgear GSM7212P GSM5212P/GSM7212P/GSM7212F/GSM7224P Setup Manual - Page 18
Netgear GSM7212P Manual
 |
View all Netgear GSM7212P manuals
Add to My Manuals
Save this manual to your list of manuals |
Page 18 highlights
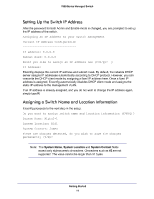
7000 Series Managed Switch Table 1. PCC Web Interface Tabs (Continued) Tabs Main tabs Maintenance Tab Contents Services to perform a firmware upgrade, to save the configuration, and to perform a backup of the configuration. Access to the NETGEAR product support website and documentation. Tthe site index that allows direct access to any of the screens under the main tabs and sub tabs. The sub tab content changes depending on the selected main tab. In turn, each sub tab provides further sub categories of functions. Help Index Sub tabs 2. Unified Web Control Buttons: Depending on the selected main tab and sub tab, in the lower right corner, buttons enable you to perform various screen-dependent operations: • Add: Add a new class, group, ACL, or VLAN Apply: Apply all changes that you made to a screen. Cancel: Cancel all changes that you made to a screen. Delete: Delete an existing list or group that was created by using an Add operation. Refresh: Refresh the data on the screen such as log entry, port statistics, and other data. 3. Index Screen: One of the unique features of the PCC is the Index screen. This screen provides links to all available screens on the PCC, allowing you to connect to each screen directly. On the Index screen, you can use your Web browser's search function to locate a particular feature, and then connect directly to the screen that enables you to view or configure that feature. Note that when you access a screen directly from the Index screen, the navigation pane does not adjust as it normally would when you navigate to the screen by using a main tag and sub tab. 4. Saving the Configuration: When you click the Apply button to save the changes, the changes are applied to the switch but not saved in the permanent memory of the switch. When you reboot the switch, the changes are lost.To save the changes in the permanent memory of the switch, use the Save Configuration function that you can reach by selecting the Maintenance tab and then the Save Config tab. Configuring an SNMP V3 User Profile Configuring an SNMP V3 user profile is a part of user configuration. Any user can connect to the switch using the SNMPv3 protocol, but for authentication and encryption, additional steps are needed. Use the following steps to configure an SNMP V3 new user profile. 1. Select System>Configuration>User Accounts from the hierarchical tree on the left side of the Web interface. 2. In the User field, select Create to create a new user. 3. Enter a new user name in the User Name field. 4. Enter a new password in the Password field and then retype it in the Confirm Password field. Getting Started 18
-
 1
1 -
2
-
3
-
4
-
5
-
6
-
7
-
8
-
9
-
10
-
11
-
12
-
 13
13 -
 14
14 -
 15
15 -
 16
16 -
 17
17 -
 18
18 -
 19
19 -
 20
20 -
 21
21 -
 22
22 -
 23
23 -
24
-
25
-
26
-
27
-
28
-
29
-
30
-
31
-
32
-
33
-
34
-
35
-
36
 |
 |
