Netgear GSM7328S-200NAS User Guide - Page 15
Step 2: Installing the Switch, Step 3: Checking the Installation
 |
View all Netgear GSM7328S-200NAS manuals
Add to My Manuals
Save this manual to your list of manuals |
Page 15 highlights
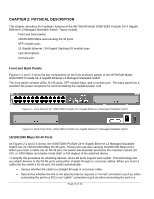
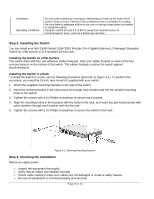
Ventilation: Operating conditions: Do not restrict airflow by covering or obstructing air inlets on the sides of the switch. Keep at least 2 inches (5.08 centimeters) free on all sides for cooling. Be sure there is adequate airflow in the room or wiring closet where you intend to install the switch. Keep the switch at least 6 ft (1.83 m) away from nearest source of electromagnetic noise, such as a photocopy machine. Step 2: Installing the Switch You can install your NETGEAR Model GSM7328S ProSafe 24+4 Gigabit Ethernet L3 Managed Stackable Switch on a flat surface or in a standard 19-inch rack. Installing the Switch on a Flat Surface The switch ships with four self-adhesive rubber footpads. Stick one rubber footpad on each of the four concave spaces on the bottom of the switch. The rubber footpads cushion the switch against shock/vibrations. Installing the Switch in a Rack To install the switch in a rack, use the following procedure (and refer to Figure 3-1). To perform this procedure, you need the 19-inch rack-mount kit supplied with your switch. 1. Attach the supplied mounting brackets to the side of the switch. 2. Insert the screws provided in the rack-mount kit through each bracket and into the bracket mounting holes in the switch. 3. Tighten the screws with a #1 Phillips screwdriver to secure each bracket. 4. Align the mounting holes in the brackets with the holes in the rack, and insert two pan-head screws with nylon washers through each bracket and into the rack. 5. Tighten the screws with a #2 Phillips screwdriver to secure the switch in the rack. Figure 3-1. Attaching Mounting Brackets Step 3: Checking the Installation Before you apply power: o Inspect the equipment thoroughly. o Verify that all cables are installed correctly. o Check cable routing to make sure cables are not damaged or create a safety hazard. o Be sure all equipment is mounted properly and securely. Page 15 of 24
-
 1
1 -
2
-
3
-
4
-
5
-
6
-
7
-
8
-
9
-
 10
10 -
 11
11 -
 12
12 -
 13
13 -
 14
14 -
 15
15 -
 16
16 -
 17
17 -
 18
18 -
 19
19 -
 20
20 -
21
-
22
-
23
-
24
-
25
-
26
 |
 |
