Netgear WAC730 Reference Manual - Page 85
button to add the classification to the Classifications field.
 |
View all Netgear WAC730 manuals
Add to My Manuals
Save this manual to your list of manuals |
Page 85 highlights
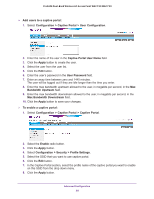
ProSAFE Dual-Band Wireless AC Access Point WAC720 WAC730 Setting Description Match Frame Source IP Fields and Match Classifications (continued) Destination IP In the Match Classifications field, enter the source IP address against which the information in the IP header needs to be matched. In the Match Classifications field, enter the destination IP address against which the information in the IP header needs to be matched. Source Port The Match Classifications field is separated into two sections. In the left section, enter the source port number, and optionally, in the right section, enter the associated IP address against which the information in the IP header needs to be matched. Destination Port The Match Classifications field is separated into two sections. In the left section, enter the destination port number, and optionally, in the right section, enter the associated IP address against which the information in the IP header needs to be matched. Apply Classification From the Apply Classification menu, select the traffic class that needs to be applied to the packets that match the selection in the Match Classifications field: • Best Effort(0) • Background(1) • Spare(2) • Excellent(3) • Control Load(4) • Video < 100 ms Latency(5) • Voice < 10 ms Latency(6) • Network Control(7) 5. (Optional) Specify rate limiting for the classification as explained in the following table: Setting Description Classification Rate Limiting Bits Per Sec. Enter a value between 0 and 300,000,000 bps to specify the maximum data rate up to which packets that match the classification are queued for transmission and sent immediately over the wireless interface. This value applies only to traffic that matches the classification. Note: When the maximum rate is exceeded, packets are retained in the queue and sent when the transmission falls again below the maximum rate. Burst Rate (Bytes) Enter a value between 0 and 37,500,000 bytes to specify the maximum amount of data that can be transmitted in a burst for packets that match the classification. This value applies only to traffic that matches the classification. 6. Click the Add button to add the classification to the Classifications field. 7. To add another classification to the QoS policy, repeat Step 4, Step 5, and Step 6. 8. Click the Apply button to save your settings. The QoS policy is saved. Advanced Configuration 85
-
 1
1 -
2
-
3
-
4
-
5
-
6
-
7
-
8
-
9
-
10
-
11
-
12
-
13
-
14
-
15
-
16
-
17
-
18
-
19
-
20
-
21
-
22
-
23
-
24
-
25
-
26
-
27
-
28
-
29
-
30
-
31
-
32
-
33
-
34
-
35
-
36
-
37
-
38
-
39
-
40
-
41
-
42
-
43
-
44
-
45
-
46
-
47
-
48
-
49
-
50
-
51
-
52
-
53
-
54
-
55
-
56
-
57
-
58
-
59
-
60
-
61
-
62
-
63
-
64
-
65
-
66
-
67
-
68
-
69
-
70
-
71
-
72
-
73
-
74
-
75
-
76
-
77
-
78
-
79
-
 80
80 -
 81
81 -
 82
82 -
 83
83 -
 84
84 -
 85
85 -
 86
86 -
 87
87 -
 88
88 -
 89
89 -
 90
90 -
91
-
92
-
93
-
94
-
95
-
96
-
97
-
98
-
99
-
100
-
101
-
102
-
103
-
104
-
105
-
106
-
107
-
108
-
109
-
110
-
111
-
112
-
113
 |
 |
