Netgear WAC740 Hardware Installation Guide - Page 16
Step 3: Connect the Access Point to Your Network
 |
View all Netgear WAC740 manuals
Add to My Manuals
Save this manual to your list of manuals |
Page 16 highlights
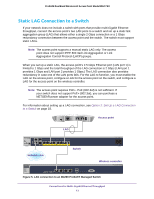
ProSAFE Dual Band Wireless AC Access Point Model WAC740 - 2.4 GHz cordless phone - 5 GHz cordless phone • Away from large metal surfaces, large glass surfaces, insulated walls, and items such as the following: - Brick walls or surfaces - Concrete walls or surfaces - Solid metal doors - Aluminum studs - Fish tanks - Mirrors Placing an external antenna in a vertical position provides best side-to-side coverage. Placing an external antenna in a horizontal position provides best up-and-down coverage. (An external antenna does not come standard with the access point.) Step 3: Connect the Access Point to Your Network Connecting the access point to the network involves the following tasks: 1. Configure the network IP address of the access point. The access point uses a DHCP client that is enabled by default. If your network includes a DHCP server, the access point obtains an IP address from the DHCP server. If your network does not include a DHCP server, the access point sets its IP address to a static IP address of 192.168.0.160. In that situation, you must use a computer to connect to the access point so that you can configure the network IP address of the access point (see Step 3a: If the Network Does Not Include a DHCP Server, Connect the Access Point to a Computer on page 17). If your network does include a DHCP server, note the following: - Make sure that Option 43 is enabled on the DHCP server. - Make sure that the DHCP server specifies the IP address of the NETGEAR wireless controller that you intend to use to discover and configure the access point. - We recommend that you reserve an IP address for the access point on the DHCP server. 2. Connect the access point to a switch. In a typical setup, you connect the access point to a switch that is connected to the same Layer 2 or Layer 3 network as the wireless controller. You can set up a single 100/1000 Mbps or 2.5 Gbps Ethernet connection to the switch or you can set up a LAG connection to the switch (see Step 3b: Connect the Access Point to a Switch on page 18). 3. Provide power to the access point. Either the switch to which you connect the access point provides PoE+ power to the access point or you must use a power adapter to provide power to the access point (see Step 3c: Provide Power to the Access Point on page 19). Installation 16
-
 1
1 -
2
-
3
-
4
-
5
-
6
-
7
-
8
-
9
-
10
-
 11
11 -
 12
12 -
 13
13 -
 14
14 -
 15
15 -
 16
16 -
 17
17 -
 18
18 -
 19
19 -
 20
20 -
 21
21 -
22
-
23
-
24
-
25
-
26
-
27
-
28
-
29
-
30
-
31
-
32
-
33
-
34
-
35
-
36
 |
 |
