Netgear WAC740 Hardware Installation Guide - Page 18
Step 3b: Connect the Access Point to a Switch
 |
View all Netgear WAC740 manuals
Add to My Manuals
Save this manual to your list of manuals |
Page 18 highlights
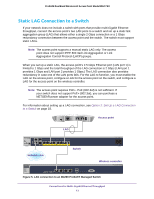
ProSAFE Dual Band Wireless AC Access Point Model WAC740 Step 3b: Connect the Access Point to a Switch You can set up a single 100/1000 Mbps or 2.5 Gbps Ethernet connection to the switch or you can set up a LAG connection to the switch. For more information about these options, see Chapter 2, Connections for Multi-Gigabit Ethernet Throughput. Option 1: Set Up a 100/1000 Mbps or 2.5 Gbps Connection to the Switch For more information about this type of setup, see Connection to a High-Speed Switch on page 12. To set up a 100/1000 Mbps or 2.5 Gbps connection to the switch: 1. Connect one end of a Category 5e (Cat 5e) cable (included with the access point) to access point LAN port 1 (the rightmost LAN port). LAN port 1 on the access point can provide a speed up to 2.5 Gbps. If the switch provides a 2.5 Gbps (or faster) connection, you could use a higher-rated Ethernet cable (Cat 6, Cat 6a, or Cat 7). 2. Connect the other end of the Ethernet cable to a port on the switch. Option 2: Set Up a LAG Connection to a Switch For more information about this type of setup, see Static LAG Connection to a Switch on page 13. To set up a LAG between the access point and the switch: 1. Connect one end of a Category 5e (Cat 5e) cable (included with the access point) to access point LAN port 1 (the rightmost LAN port). 2. Connect the other end of the Ethernet cable to a port on the switch. 3. Connect one end of another (Cat 5e) cable (not included with the access point) to access point LAN port 2. LAN port 2 on the access point can be used only for a LAG connection. 4. Connect the other end of the Ethernet cable to a port on the switch. 5. On the switch, configure a static LAG for the access point. For more information, see the documentation for your switch. If you use a NETGEAR M4200 ProSAFE Managed Switch, see the M4200 and M4300 Series ProSAFE Managed Switches Web Management User Manual, which you can download by visiting downloadcenter.netgear.com. Note: For the LAG to function, you must also enable link aggregation on the access point itself and configure link aggregation for the access point on the wireless controller. For information about these configurations, see the ProSAFE Wireless Controller Models WC7500, WC7600, WC7600v2, and WC9500 User Manual, which you can download by visiting downloadcenter.netgear.com. Installation 18
-
 1
1 -
2
-
3
-
4
-
5
-
6
-
7
-
8
-
9
-
10
-
11
-
12
-
 13
13 -
 14
14 -
 15
15 -
 16
16 -
 17
17 -
 18
18 -
 19
19 -
 20
20 -
 21
21 -
 22
22 -
 23
23 -
24
-
25
-
26
-
27
-
28
-
29
-
30
-
31
-
32
-
33
-
34
-
35
-
36
 |
 |
