Netgear WNA1000M WNA1000M User Manual (PDF) - Page 12
WNA1000M Icon, Smart Wizard Status Bar, Color, Meaning, Recommended Action
 |
View all Netgear WNA1000M manuals
Add to My Manuals
Save this manual to your list of manuals |
Page 12 highlights
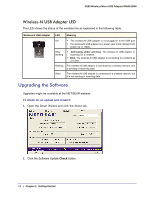
N150 Wireless Micro USB Adapter WNA1000M WNA1000M Icon This icon is on the desktop and in the Windows system tray. The system tray is on one end of the task bar in the Microsoft Windows desktop. The icon color shows the wireless connection. Color Red Meaning Recommended Action The wireless-N USB adapter is not Check your configuration, or try moving to a location connected to a wireless network. where the wireless signal quality is better. Yellow Green The wireless-N USB adapter has a Move to a better location, such as closer to the wireless weak wireless connection. access point. Also, look for interference such as from a 2.4 GHz cordless phone or large metal surface. The wireless connection is good. No action is required Smart Wizard Status Bar For more information, you can view the Smart Wizard status bar. Click the icon to open the Smart Wizard status bar. The Smart Wizard Settings tab displays. The status bar is located at the bottom of the Settings tab. Security Channel Throughput Wireless network Signal strength Join a Network Connection status The following table describes how to interpret the Smart Wizard status bar. Understanding the Status Bar Wireless network Identifies which wireless network you have joined. Security • A closed lock indicates that security is enabled. • An open lock indicates an open network without wireless security. Channel The wireless channel used by the network. If many wireless networks in your area use the same channel, they can interfere with one another. Throughput • To optimize wireless throughput, connect to a network with a high-speed router or access point and a high-speed Internet connection.See Chapter 3. • If your computer has a USB v1.1 port, the wireless-N USB adapter is limited to that port's maximum speed, which is 14 Mbps. 12 | Chapter 1: Getting Started
-
 1
1 -
2
-
3
-
4
-
5
-
6
-
 7
7 -
 8
8 -
 9
9 -
 10
10 -
 11
11 -
 12
12 -
 13
13 -
 14
14 -
 15
15 -
 16
16 -
 17
17 -
18
-
19
-
20
-
21
-
22
-
23
-
24
-
25
-
26
-
27
-
28
-
29
-
30
-
31
-
32
-
33
-
34
-
35
-
36
-
37
-
38
-
39
-
40
-
41
-
42
-
43
 |
 |
