Nikon COOLPIX 5200 User Manual - Page 19
Close the battery-chamber cover - battery cover replacement
 |
UPC - 018208255160
View all Nikon COOLPIX 5200 manuals
Add to My Manuals
Save this manual to your list of manuals |
Page 19 highlights
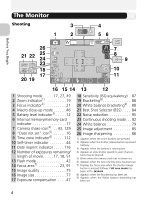
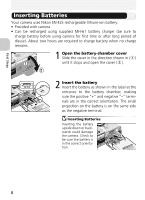
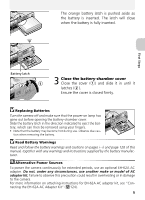
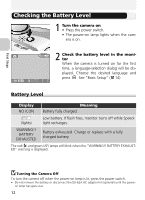
The orange battery latch is pushed aside as the battery is inserted. The latch will close when the battery is fully inserted. First Steps Battery latch 3 Close the battery-chamber cover Close the cover ( ) and slide it in until it latches ( ). Ensure the cover is closed firmly. Replacing Batteries Turn the camera off and make sure that the power-on lamp has gone out before opening the battery-chamber cover. Slide the battery latch in the direction indicated to eject the battery, which can then be removed using your fingers. • Note that the battery may become hot during use. Observe due cau- tion when removing the battery. Read Battery Warnings Read and follow the battery warnings and cautions on pages i - ii and page 128 of this manual, together with any warnings and instructions supplied by the battery manufacturer. Alternative Power Sources To power the camera continuously for extended periods, use an optional EH-62A AC adapter. Do not, under any circumstances, use another make or model of AC adapter kit. Failure to observe this precaution could result in overheating or in damage to the camera. For more information on attaching instructions for EH-62A AC adapter kit, see "Connecting the EH-62A AC Adapter Kit" ( 124). 9
-
 1
1 -
2
-
3
-
4
-
5
-
6
-
7
-
8
-
9
-
10
-
11
-
12
-
13
-
 14
14 -
 15
15 -
 16
16 -
 17
17 -
 18
18 -
 19
19 -
 20
20 -
 21
21 -
 22
22 -
 23
23 -
 24
24 -
25
-
26
-
27
-
28
-
29
-
30
-
31
-
32
-
33
-
34
-
35
-
36
-
37
-
38
-
39
-
40
-
41
-
42
-
43
-
44
-
45
-
46
-
47
-
48
-
49
-
50
-
51
-
52
-
53
-
54
-
55
-
56
-
57
-
58
-
59
-
60
-
61
-
62
-
63
-
64
-
65
-
66
-
67
-
68
-
69
-
70
-
71
-
72
-
73
-
74
-
75
-
76
-
77
-
78
-
79
-
80
-
81
-
82
-
83
-
84
-
85
-
86
-
87
-
88
-
89
-
90
-
91
-
92
-
93
-
94
-
95
-
96
-
97
-
98
-
99
-
100
-
101
-
102
-
103
-
104
-
105
-
106
-
107
-
108
-
109
-
110
-
111
-
112
-
113
-
114
-
115
-
116
-
117
-
118
-
119
-
120
-
121
-
122
-
123
-
124
-
125
-
126
-
127
-
128
-
129
-
130
-
131
-
132
-
133
-
134
-
135
-
136
-
137
-
138
-
139
-
140
-
141
-
142
-
143
-
144
-
145
-
146
-
147
-
148
-
149
-
150
-
151
-
152
 |
 |
