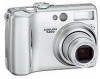
Nikon COOLPIX 5200 User Manual - Page 52
When Lighting Is Poor: Using the Flash
 |
UPC - 018208255160
View all Nikon COOLPIX 5200 manuals
Add to My Manuals
Save this manual to your list of manuals |
Page 52 highlights
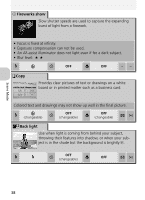
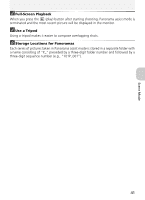
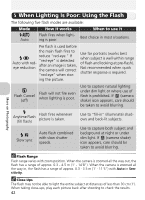
More on Photography When Lighting Is Poor: Using the Flash The following five flash modes are available: Mode Auto How it works Flash fires when lighting is poor. When to use it Best choice in most situations. Pre flash is used before the main flash fires to reduce "red-eye." If Auto with redeye reduction "red-eye" is detected after an image is taken, the camera will correct "red-eye" when stor- Use for portraits (works best when subject is well within range of flash and looking at pre-flash). Not recommended when quick shutter response is required. ing the picture. Flash Cancel (off) Flash will not fire even when lighting is poor. Use to capture natural lighting under dim light or where use of flash is prohibited. If (camera shake) icon appears, care should be taken to avoid blurring. More on Photography Anytime Flash (fill flash) Flash fires whenever picture is taken. Slow sync Auto flash combined with slow shutter speeds. Use to "fill-in" (illuminate) shadows and back-lit subjects. Use to capture both subject and background at night or under dim light. If (camera shake) icon appears, care should be taken to avoid blurring. Flash Range Flash range varies with zoom position. When the camera is zoomed all the way out, the flash has a range of approx. 0.3 - 4.5 m (1' - 14'8"). When the camera is zoomed all the way in, the flash has a range of approx. 0.3 - 3.5 m (1' - 11'5") with Auto in Sensitivity. Close-Ups The flash may not be able to light the entire subject at distances of less than 30 cm (1'). When taking close-ups, play each picture back after shooting to check the results. 42
-
 1
1 -
2
-
3
-
4
-
5
-
6
-
7
-
8
-
9
-
10
-
11
-
12
-
13
-
14
-
15
-
16
-
17
-
18
-
19
-
20
-
21
-
22
-
23
-
24
-
25
-
26
-
27
-
28
-
29
-
30
-
31
-
32
-
33
-
34
-
35
-
36
-
37
-
38
-
39
-
40
-
41
-
42
-
43
-
44
-
45
-
46
-
 47
47 -
 48
48 -
 49
49 -
 50
50 -
 51
51 -
 52
52 -
 53
53 -
 54
54 -
 55
55 -
 56
56 -
 57
57 -
58
-
59
-
60
-
61
-
62
-
63
-
64
-
65
-
66
-
67
-
68
-
69
-
70
-
71
-
72
-
73
-
74
-
75
-
76
-
77
-
78
-
79
-
80
-
81
-
82
-
83
-
84
-
85
-
86
-
87
-
88
-
89
-
90
-
91
-
92
-
93
-
94
-
95
-
96
-
97
-
98
-
99
-
100
-
101
-
102
-
103
-
104
-
105
-
106
-
107
-
108
-
109
-
110
-
111
-
112
-
113
-
114
-
115
-
116
-
117
-
118
-
119
-
120
-
121
-
122
-
123
-
124
-
125
-
126
-
127
-
128
-
129
-
130
-
131
-
132
-
133
-
134
-
135
-
136
-
137
-
138
-
139
-
140
-
141
-
142
-
143
-
144
-
145
-
146
-
147
-
148
-
149
-
150
-
151
-
152
 |
 |
