Nikon D200 D200 User's Manual - Page 132
The monitor turns off when the shutter-release button is, record the data.
 |
UPC - 018208252350
View all Nikon D200 manuals
Add to My Manuals
Save this manual to your list of manuals |
Page 132 highlights
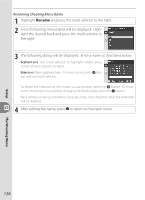
Setup The Setup Menu 3 With the lens ten centimeters (four inches) from a bright, featureless white object, frame the object so that nothing else is visible in the viewfinder and press the shutter-release button halfway. In autofocus mode, focus will automatically be set to infinity; in manual focus mode, set focus to infinity manually before pressing the shutter-release button. If using the aperture ring to set aperture, choose the minimum setting (largest f/-number). 4 Press the shutter-release button the rest of the way down to acquire Image Dust Off reference data (note that noise reduction turns on automatically when the subject is poorly lit, increasing the amount of time needed to record the data). The monitor turns off when the shutter-release button is pressed. If the reference object is too bright or too dark, the camera may be unable to acquire Image Dust Off reference data and the message shown at right will be displayed. Choose another reference object and repeat the process from Step 1. Image Dust Off The Image Dust Off feature in Nikon Capture 4 Version 4.4 or later (available separately) processes NEF (RAW) photographs to remove the effects of dust in the camera imaging system by comparing the images to the data acquired with Dust Off Ref Photo. It is not available with JPEG images. The same reference data can be used for NEF (RAW) photographs taken with different lenses or at different apertures. Image Dust Off Reference Data Reference images can not be viewed using computer imaging software. A grid pattern is displayed when reference images are viewed on the camera. 122
-
 1
1 -
2
-
3
-
4
-
5
-
6
-
7
-
8
-
9
-
10
-
11
-
12
-
13
-
14
-
15
-
16
-
17
-
18
-
19
-
20
-
21
-
22
-
23
-
24
-
25
-
26
-
27
-
28
-
29
-
30
-
31
-
32
-
33
-
34
-
35
-
36
-
37
-
38
-
39
-
40
-
41
-
42
-
43
-
44
-
45
-
46
-
47
-
48
-
49
-
50
-
51
-
52
-
53
-
54
-
55
-
56
-
57
-
58
-
59
-
60
-
61
-
62
-
63
-
64
-
65
-
66
-
67
-
68
-
69
-
70
-
71
-
72
-
73
-
74
-
75
-
76
-
77
-
78
-
79
-
80
-
81
-
82
-
83
-
84
-
85
-
86
-
87
-
88
-
89
-
90
-
91
-
92
-
93
-
94
-
95
-
96
-
97
-
98
-
99
-
100
-
101
-
102
-
103
-
104
-
105
-
106
-
107
-
108
-
109
-
110
-
111
-
112
-
113
-
114
-
115
-
116
-
117
-
118
-
119
-
120
-
121
-
122
-
123
-
124
-
125
-
126
-
 127
127 -
 128
128 -
 129
129 -
 130
130 -
 131
131 -
 132
132 -
 133
133 -
 134
134 -
 135
135 -
 136
136 -
 137
137 -
138
-
139
-
140
-
141
-
142
-
143
-
144
-
145
-
146
-
147
-
148
-
149
-
150
-
151
-
152
-
153
-
154
-
155
-
156
-
157
-
158
-
159
-
160
-
161
-
162
-
163
-
164
-
165
-
166
-
167
-
168
-
169
-
170
-
171
-
172
-
173
-
174
-
175
-
176
-
177
-
178
-
179
-
180
-
181
-
182
-
183
-
184
-
185
-
186
-
187
-
188
-
189
-
190
-
191
-
192
-
193
-
194
-
195
-
196
-
197
-
198
-
199
-
200
-
201
-
202
-
203
-
204
-
205
-
206
-
207
-
208
-
209
-
210
-
211
-
212
-
213
-
214
-
215
-
216
-
217
-
218
-
219
-
220
-
221
 |
 |
