Nokia 2180 Nokia 2180 User Guide in English
Nokia 2180 Manual
 |
View all Nokia 2180 manuals
Add to My Manuals
Save this manual to your list of manuals |
Nokia 2180 manual content summary:
- Nokia 2180 | Nokia 2180 User Guide in English - Page 1
-i - Nokia 2180 | Nokia 2180 User Guide in English - Page 2
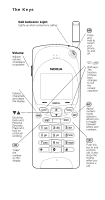
Scroll the menu and Personal Directory. Press and hold for continual scrolling. í "Dials" the number on the display. 0 ð Press and hold to switch your phone on and off. Soft keys. The function of these keys changes to suit the current operation. ÷ Alpha/ numeric mode selection. Allows you to toggle - Nokia 2180 | Nokia 2180 User Guide in English - Page 3
unavailable A call is in progress Digital service is available Roaming Indicator Phone is roaming in a non-preferred system Your phone is in alpha mode You have a voice message(s) You have a text message(s) Memory location, menu, or option number Battery Charge Signal Strength Setting Indicator 0HQX - Nokia 2180 | Nokia 2180 User Guide in English - Page 4
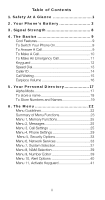
Safety At A Glance 1 2. Your Phone's Battery 3 3. Signal Strength 8 4. The Basics 9 Cool Features 9 To Switch Your Phone On 9 To Answer A Call 25 Menu 3, Call Settings 25 Menu 4, Phone Settings 29 Menu 5, Security Options 33 Menu 6, Network Services 33 Menu 7, System Selection 37 Menu 8, - Nokia 2180 | Nokia 2180 User Guide in English - Page 5
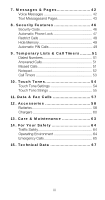
42 Text Messagesand Pages 43 8. Security Features 46 Security Code 46 Automatic Phone Lock 47 Restrict Calls 48 Hide Memory 49 Automatic Tone Strings 55 11. Data & Fax Calls 57 12. Accessories 58 Batteries 58 Chargers 60 13. Care & Maintenance 63 14. For Your Safety 64 Traffic - Nokia 2180 | Nokia 2180 User Guide in English - Page 6
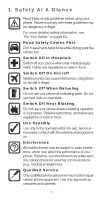
a blasting operation is in progress. Observe restrictions, and follow any regulations or rules in force. Use Sensibly Use only in the normal position (to ear). Avoid unnecessary contact with the antenna when phone is on. Interference All mobile phones may be subject to radio interference, which - Nokia 2180 | Nokia 2180 User Guide in English - Page 7
can then activate these functions as described in this manual. The manual activation commands for various network services are not presented in this manual (e.g. using ∗ and # characters for activating or deactivating services). Nevertheless, your phone is capable of handling commands given in that - Nokia 2180 | Nokia 2180 User Guide in English - Page 8
have found at least one battery and charger, one transceiver, and this user guide. For detailed information on these items, see “Accessories” on page 58. To install your battery Simply (1) place the battery in the grooves on the back of your phone. Then (2) slide the battery upward until it clicks - Nokia 2180 | Nokia 2180 User Guide in English - Page 9
while it is on or off. Simply connect the lead from the charger to the bottom of your phone or place it on a charging stand. Then connect the charger to a standard 120V AC outlet. When the battery begins charging, the battery strength indicator on the right side of the display will scroll and your - Nokia 2180 | Nokia 2180 User Guide in English - Page 10
still fails, disconnect the charger from your phone. Then reconnect the charger to your phone and retry. If you still experience charging problems, contact your dealer and, if necessary, bring your phone in to have it serviced. Also remember to bring in your battery and charger. To discharge your - Nokia 2180 | Nokia 2180 User Guide in English - Page 11
discharge facility of any approved accessory available for your phone. Do not attempt to discharge the battery by any other means. When a charger is not in use, disconnect it from the power source. Do not leave the battery connected to a charger for longer than a week, since overcharging may shorten - Nokia 2180 | Nokia 2180 User Guide in English - Page 12
serviceable parts. Don’t attempt to open the case. Don’t dispose of a battery in a fire! Dispose of used batteries in accordance with local regulations. Recycle! Using your phone phone switches itself off if the operating temperature of your phone the battery charge is very low, your phone reduces - Nokia 2180 | Nokia 2180 User Guide in English - Page 13
calling from inside a building. No service If you’re outside the wireless service area, 12 6(59,&( will display on your phone. No calls can be made or received, including emergency calls. Unavailable service When network service is unavailable from your service provider or its affiliates, emergency - Nokia 2180 | Nokia 2180 User Guide in English - Page 14
Cool Features. These are just some of the many Cool Features you’ll find in your phone. Look for the icon throughout this owner’s manual to see how you can use these Cool Features. To Switch Your Phone On ð 1) Press and hold for about three seconds 2) If you want to make a call, fully - Nokia 2180 | Nokia 2180 User Guide in English - Page 15
, include area code if necessary í 3) Press If the call didn't go through It may be because the signal is too weak, in which case you’ll hear three beeps and the icon disappears from the display. It may also be because you have attempted a call to a restricted number or your phone is locked - Nokia 2180 | Nokia 2180 User Guide in English - Page 16
An Emergency Call Before attempting any emergency calls, see “Emergency Calls” on page 65 for important safety information. 1) Switch your phone on and make sure service is available ù 2) Press and hold to clear the display. Enter the í emergency number (e.g. 911) and press . Give your location and - Nokia 2180 | Nokia 2180 User Guide in English - Page 17
Note: Keyguard cannot be activated when your phone is connected to a car kit or an office handsfree kit. To deactivate Keyguard Press 0HQX, then ∗ To answer a call with Keyguard active í Press During the call, the keypad remains unlocked for normal operation. Keyguard automatically reactivates after - Nokia 2180 | Nokia 2180 User Guide in English - Page 18
, Keyguard automatically becomes active again. Note: When Keyguard is active, calls may be possible to the emergency number programmed into your phone (e.g. 911 or other official emergency number). However, Emergency Key 9 will not operate. Speed Dial Speed Dial is a convenient feature, allowing you - Nokia 2180 | Nokia 2180 User Guide in English - Page 19
Caller ID is a feature that may be available from your service provider. This feature helps identify incoming calls, so you can decide if you want to answer the call. If Caller ID is active, your phone may display the caller’s phone number. If the caller’s name is stored in your personal directory - Nokia 2180 | Nokia 2180 User Guide in English - Page 20
caller’s identification. To activate or deactivate Call Waiting In some areas, your service provider may give you a feature code to activate or deactivate Call Waiting. You may choose to store this code into your phone using Menu 6 7, Network Feature Setting. Use Menu 6 4 to $FWLYDWH or &DQFHO Call - Nokia 2180 | Nokia 2180 User Guide in English - Page 21
call, 1) Press and hold left for a second 2) Press W or V to 0XWH 3) Press 2. Note: This feature is only available during a call. To unmute your phone's microphone Follow the same steps as above, except press W or V to 8QPXWH and press 2.. For more information on DTMF tones, please see “Touch Tones - Nokia 2180 | Nokia 2180 User Guide in English - Page 22
long. Stored names may be up to 16 characters long. Your phone has 8 “extended number” locations (of your choice) that allow the ÷ To enter names, retrieve numbers based on names, and view names, press . Your phone displays ABC to indicate that you can use the number keys to enter letters as well - Nokia 2180 | Nokia 2180 User Guide in English - Page 23
to enter these special characters: Press This Key: To Get This Special Character: óó +, links memory locations together óóó p, creates a pause óóóó w, causes the phone to wait for input Also, see “Touch Tones” on page 54 for more information on using special characters. To store a name - Nokia 2180 | Nokia 2180 User Guide in English - Page 24
To Store Numbers and Names To fast save 1) Enter phone number 2) Press and hold 0HPRU\ To add a name to a stored phone number 1) Recall stored number (notice memory location at top, right corner of display; write this number down to use in step 4) ÷ 2) Press then enter name 3) - Nokia 2180 | Nokia 2180 User Guide in English - Page 25
Note: Erase functions are permanent, so be careful! To erase all stored numbers 1) Press 0HQX 01 5 2) Press W to (UDVH $OO/ press 2. 3) Enter security code at 6HFXULW\ FRGH=, press 2. 4) Press 2. at $5( - Nokia 2180 | Nokia 2180 User Guide in English - Page 26
Press to call the displayed number or name. To recall numbers by name 1) Press 0HPRU\ 2) Enter name or its first few letters 3) Press )LQG Your phone may find more than one entry that begins with the same letter. Use W or V until the desired name appears. To begin scrolling at a particular location - Nokia 2180 | Nokia 2180 User Guide in English - Page 27
and allowing you to customize your phone to suit your individual preferences. Menu Guidelines 0HQX enters your phone’s menu structure W and V scroll each other when using this method. Most of the instructions given in this guide use this method, e.g. to access the Dialed Numbers submenu, simply press the - Nokia 2180 | Nokia 2180 User Guide in English - Page 28
Calling Card 8 One-Touch PIN Calls 9 Messages Only Mode See page 25 for details Phone Settings Menu 4 1 Lights 2 Keypad Tones 3 Manual DTMF 29 for details Security Options Menu 5 1 Automatic Phone Lock 2 Change Lock Code 3 Restrict Calls 4 Hide Memory See page 46 for details Network Services Menu 6 - Nokia 2180 | Nokia 2180 User Guide in English - Page 29
7 Network Feature Setting See page 33 for details. System Selection Menu 7 This feature selects which system your phone uses while travelling outside your home and preferred service areas (roaming), as well as within your home area. See page 37 for details. NAM Selection Menu 8 This feature allows - Nokia 2180 | Nokia 2180 User Guide in English - Page 30
as One-Touch Dialing and Emergency Key 9, as well as storing up to four long-distance calling cards. Menu 3 1, Ringing Volume You hear each ringing level as you scroll through the volume levels. When your phone is connected to an accessory, such as a headset or a car kit, the ringing volume for that - Nokia 2180 | Nokia 2180 User Guide in English - Page 31
is 21, calls may be possible to the emergency number programmed into your phone (e.g. 911 or other official emergency number). However, Emergency Key 9 will for more information. Menu 3 5 Automatic Redial ô When this is on, your phone redials the number you are trying to call up to 3 times. Press to - Nokia 2180 | Nokia 2180 User Guide in English - Page 32
calls unless you select a different one. To store a calling card Once you press 0HQX 3 7, your phone lists &DUG $0' and 1RQH. Press W to select the card you want and press 2.. Enter your five-digit security code at the 6HFXULW\ &RGH: prompt, then press 2.. This gives you the 6(/(&7 ',$/0 ,1* 6(48 - Nokia 2180 | Nokia 2180 User Guide in English - Page 33
, when necessary, to send any other numbers that must be sent along with any stored calling card information. To change stored calling card information If you wish to change any calling card information already stored in your phone, simply follow the same instructions used to store a new calling - Nokia 2180 | Nokia 2180 User Guide in English - Page 34
as needed. Menu 3 8, One-Touch Pin Calls One-Touch PIN is a network security feature that is used to help prevent fraud. Please see “Automatic PIN Calls” on page 49 for more information. Menu 3 9, Messages Only Mode Your phone will not ring when you set it to Messages Only Mode. Instead, your - Nokia 2180 | Nokia 2180 User Guide in English - Page 35
be used for many automated, over-the-phone services such as checking your bank balance, using your voice mailbox options, and even checking airplane arrival and departure times. These two features set the length of your phone’s touch tones when pressed manually or sent automatically. See “Touch Tone - Nokia 2180 | Nokia 2180 User Guide in English - Page 36
the time you have entered has elapsed. The timer stops if the battery runs out or if you turn your phone off. An incoming call overrides the timer alarm. After you’ve completed the call, &2817'2:1 &200 3/(7(' appears, but your phone does not sound an alarm. To stop the timer before the alarm - Nokia 2180 | Nokia 2180 User Guide in English - Page 37
a call. Because this feature is network-supported, there is no need to set the date or time. However, you must activate this feature through your phone’s menu. This feature functions in areas only where digital service is available. To display network time Your phone can display both day of the week - Nokia 2180 | Nokia 2180 User Guide in English - Page 38
is Date&Time. Menu 5, Security Options Your phone contains many security features, such as hiding memory locations, restricting calls, and locking your phone. For information on these and other security features, see “Security Features” on page 46. Menu 6, Network Services Some of the features - Nokia 2180 | Nokia 2180 User Guide in English - Page 39
will automatically return to $QD1& 'LJ1 when you end a phone call or when your phone is turned off and back on again. Menu 6 3, Call Forwarding This feature is a network service that must be subscribed from your service provider. This feature is used to forward incoming calls to another specified - Nokia 2180 | Nokia 2180 User Guide in English - Page 40
network to screen incoming calls. The caller’s phone number is compared to either an allowed numbers if activated with Menu 6 7. Contact your service provider for details. $OORZHG 1XPEHUV /LVW allows $FWLYDWH option turns the restriction on. The 'HDFWL0 YDWH turns the restriction off. The (GLW option - Nokia 2180 | Nokia 2180 User Guide in English - Page 41
to any of these services, your service provider or dealer gives you a separate code (known as a “feature code”) to activate and deactivate each service. Menu 6 7 lets you store all the feature codes you use in your phone. Once the feature code is stored in your phone, the service appears as a menu - Nokia 2180 | Nokia 2180 User Guide in English - Page 42
menu Follow same steps as in “To store codes”, except press 2. at )HDWXUH FRGH= (without entering a code). Note: Any feature codes that are received from your service provider are unrelated to your phone’s security code. Menu 7, System Selection This selection can be significant to the amount - Nokia 2180 | Nokia 2180 User Guide in English - Page 43
you choose? When roaming in an area where no home or preferred systems are available, you can manually choose which system your phone uses. System choices Depending on which system is in use, your phone will display either the A or B indicator or no indicator in the top, left hand corner of your - Nokia 2180 | Nokia 2180 User Guide in English - Page 44
phone will beep once. Menu 8, NAM Selection The service provider programs your phone with the phone number and system information into your phone’s memory when your phone Menu 9, Number Editor You can edit the digits of a phone number that’s currently displayed. This helps in many instances, - Nokia 2180 | Nokia 2180 User Guide in English - Page 45
it If you wish to store the edited phone number, the message 5(3/$&(" followed by the associated battery (BBT-1XV) when selecting vibrating options. See your dealer for details. With 6LOHQW, your phone / 9LEUDWH or 6LOHQW has been chosen, your phone displays 6,/(17. Call-related tones like message - Nokia 2180 | Nokia 2180 User Guide in English - Page 46
Menu 11, Activate Keyguard Please see “Keyguard” on page 12 for information on this feature. 41 - Nokia 2180 | Nokia 2180 User Guide in English - Page 47
from your voice mailbox, your voice mailbox number must first be stored in your phone. When you receive a voice message or a page, the display text may vary due to short message services used by different service providers. To store your voice mailbox number Use Menu 2 3 to store your voice mailbox - Nokia 2180 | Nokia 2180 User Guide in English - Page 48
are heard. See “The Display” at the beginning of this owner’s manual for a description of the Text Message indicator. If someone has paged you, your phone displays 3/($6( &$// followed by the phone number. Note: Some service providers may send a text message when notifying you of any pages received - Nokia 2180 | Nokia 2180 User Guide in English - Page 49
that you’ve locked the message or page. It will not be overwritten even if there’s no space remaining in your phone’s memory and there’s an attempt to deliver a new message to your phone. New messages or pages will override old unlocked messages or pages when there is no space remaining in your - Nokia 2180 | Nokia 2180 User Guide in English - Page 50
or deactivated. If you turn your phone off without deactivating the Messages Only Mode, it will display ,1&20,1* &$//6 %/2&.(' when you first turn it back on. The default setting for this feature is 2II. Note: Check with your service provider to see if they support this feature. If not, you may - Nokia 2180 | Nokia 2180 User Guide in English - Page 51
8. Security Features Security Code Your phone will prompt you for a fivedigit security code to enter certain features. The factory default code is 12345, and that is what your phone will accept until it is changed. If your service provider hasn’t already changed your security code, it’s recommended - Nokia 2180 | Nokia 2180 User Guide in English - Page 52
only when Emergency Key 9 is turned on with Menu 3 4. If your phone is locked and you switch your phone off and back on again, you must enter the lock code. To enter the lock code At (QWHU ORFN FRGH=, enter the lock code and press 2.. Note: Your security code can be entered in place of the lock - Nokia 2180 | Nokia 2180 User Guide in English - Page 53
to have your security code handy, you’ll need it to change the lock code. Note: Avoid entering access codes similar to emergency numbers to prevent accidental emergency calls. Menu 5 3, Restrict Calls This feature allows you to restrict incoming and outgoing calls to and from your phone. You can - Nokia 2180 | Nokia 2180 User Guide in English - Page 54
OORZHG. Menu 5 3 3, Restrict all incoming calls $OORZHG service provider to see if your network uses this security feature. To use this feature, you must set Menu 3 8, 21(0728&+ 3,1 &$//6, to 2Q. After you select 2Q, the phone asks you to enter a PIN Code. Enter the code given to you by your service - Nokia 2180 | Nokia 2180 User Guide in English - Page 55
PIN Calls, enter Menu 3 8 and select 2II, then press 2.. Note: All PIN Codes are assigned by the service provider. To make calls using PIN Codes Make sure that Menu 3 8 is set to 2Q. 1) Make the call as normal 2) The phone displays 3,1 &$// 3) When you hear the audio PIN prompt, press 2. to send the - Nokia 2180 | Nokia 2180 User Guide in English - Page 56
gives you ten temporary storage spaces in a “notepad.” Note: Your phone displays the phone numbers of received and missed calls only if you have subscribed to , press ∗ then W or V to scroll the list. This shows the calling phone numbers of the ten most re- ÷ cent calls you’ve answered. If the number - Nokia 2180 | Nokia 2180 User Guide in English - Page 57
the following step. With display empty, press ∗ twice (a + will appear on the display), then press W or V to scroll the list This shows you the calling phone numbers of the 10 most recent calls you’ve missed. 0HQX 01 3 also accesses the Missed Calls list. When the )25:$5' ,) 127 $16:(5(' option in - Nokia 2180 | Nokia 2180 User Guide in English - Page 58
for each phone number (NAM) your phone uses. This shows call durations for the NAM that is currently selected. Use 0HQX 01 7 and press W repeatedly to show durations of /$67 6, +20( $5($ &$//6, 52$0,1* &$//6 & 727$/ ,10&$// 7,0(. Note: The actual time invoiced for calls by your service provider may - Nokia 2180 | Nokia 2180 User Guide in English - Page 59
phone can generate various sounds, called Touch Tones, when the keys are pressed. Touch Tones can be used for many automated, over-thephone services manually or automatically. Note: Individual Touch Tones can be sent manually only if Menu 4 3 is set to 2Q. Touch Tone Settings Menu 4 3, Manual - Nokia 2180 | Nokia 2180 User Guide in English - Page 60
numbers. These number strings can also be linked with other stored phone numbers. Read on for more information on linking strings with stored Pressing creates a “w” (wait) when you are storing numbers. The “w” makes the phone wait for you to press the '70) soft key, then it sends the digits - Nokia 2180 | Nokia 2180 User Guide in English - Page 61
location storing the DTMF string 4) Store the number as you normally would í When you recall this number sequence from memory and press , your phone dials the phone number, displays digits stored in the memory location after the “+”, then sends them as Touch Tones when you press '70). Note: Your - Nokia 2180 | Nokia 2180 User Guide in English - Page 62
it’s connected to a compatible data terminal (such as a PC) through a data adapter (such as a PC card) and a compatible cellular cable. You can also send and receive faxes when your phone is connected to a data terminal with fax capability through a data adapter and a compatible cellular cable. Note - Nokia 2180 | Nokia 2180 User Guide in English - Page 63
phone’s sales package, you may also find a separate full color accessories brochure. You can select from a wide range of Nokia accessories to accommodate your specific personnel only. Note: Use only batteries, antennas, chargers, and accessories approved by the phone manufacturer. The use of any - Nokia 2180 | Nokia 2180 User Guide in English - Page 64
Also, see “Your Phone’s Battery” on page 3 and “Important battery information” on page 6. Approximate battery operation times Battery Charging Time Talk Time Standby Time (BBH-1S) Slim 600 mAh NiMH 60 min. (Digital) Up to 1 hr. 15 min. (Analog) Up to 1 hr. (Digital) - Nokia 2180 | Nokia 2180 User Guide in English - Page 65
you charge?” on page 4. Rapid Travel Charger (ACH-4U) This light and compact AC charger can be used with all battery options. To use the Rapid Travel Charger, plug it into a wall outlet and connect the lead from the charger to the base of your phone. This charger can also be used together with the - Nokia 2180 | Nokia 2180 User Guide in English - Page 66
You can charge your phone’s battery from your vehicle’s battery by using the Rapid Cigarette Lighter Charger (LCH-2). Calls are possible during charging. If the charger is connected to your phone, a red light indicates that your phone is charging. A green light means your phone is either finished - Nokia 2180 | Nokia 2180 User Guide in English - Page 67
Charging Stand (CHH-2L) offers support for the phone during charging. Used together with the Rapid Travel Charger (ACH-4U), this drop-in stand is an economical choice when you need your phone close at hand, always ready for calls. Charging is indicated by the scrolling battery bars on the right side - Nokia 2180 | Nokia 2180 User Guide in English - Page 68
temperatures can shorten the life of electronic devices, damage batteries, and warp or melt certain plastics. Do not store your phone in cold areas. When your phone warms up (to its normal temperature), moisture can form inside your phone, which may damage electronic circuit boards. Do not attempt - Nokia 2180 | Nokia 2180 User Guide in English - Page 69
phone, park the vehicle before conversing. Always secure your phone in its holder; do not place your phone other mobile radio transmitting equipment, users are Users are advised to switch off their phones when at a refueling point (gas station). Users are reminded of the need to observe restrictions - Nokia 2180 | Nokia 2180 User Guide in English - Page 70
network, and is illegal. Failure to observe these instructions may lead to suspension or denial of cellular telephone services to the offender, or legal action or both. Emergency Calls IMPORTANT! Your phone, like any cellular phone, operates using radio signals, cellular and landline networks - Nokia 2180 | Nokia 2180 User Guide in English - Page 71
phone If certain features are in use (Keyguard, Locking, Call Restricting etc.), you may first need to turn those features off before you can make an emergency call. Consult this document and your local cellular service only batteries, antennas, chargers and accessories approved by the phone - Nokia 2180 | Nokia 2180 User Guide in English - Page 72
(AMPS) 10µW to 250mW (CDMA) Battery Voltage 6 V nominal Charging current Operating phone was written for dual-mode phone NHD-4NX. The right to make changes and improvements to any of the products described in this guide without prior notice is reserved. Issue No. 3. ©1998 Nokia Mobile Phones - Nokia 2180 | Nokia 2180 User Guide in English - Page 73
Nokia Mobile Phones, Inc. (“NMPI”) warrants that this cellular phone any subsequent purchaser/end user. 3. The limited warranty the Customer Service Department of NMPI. NMPI shall after the completion of service under this limited warranty. fuses. b) The Customer Service Department at NMPI was not - Nokia 2180 | Nokia 2180 User Guide in English - Page 74
or by inadequate signal reception by the external antenna. 8. If a problem develops during the limited warranty period, the Consumer should take the contact the Customer Service Department at NMPI, at the phone number listed on the bottom of this page for further instructions. c) The Consumer - Nokia 2180 | Nokia 2180 User Guide in English - Page 75
to state. 12. NMPI neither assumes nor authorizes any authorized service center or any person or entity to assume for it any other . 14. The limited warranty period for Nokia Product Corp. supplied attachments and accessories are specifically defined within their own warranty cards and packaging. 70 - Nokia 2180 | Nokia 2180 User Guide in English - Page 76
battery 5 Important battery info. 6 Installing and removing 3 C Call Forwarding 33 Call Restriction 47 Call settings 25 Call timers 52 Call Waiting 15 Caller ID 14 Calling card 27 Care and maintenance 62 Chargers 59 Charging and recharging 4 Cool Features 9 Automatic phone code 46 Changing your lock - Nokia 2180 | Nokia 2180 User Guide in English - Page 77
microphone 16 N NAM selection 38 Network feature setting 35 Network services 32 Network time 32 Displaying network time 32 Notepad 51 Security code 45 Security features 45 Selective Call Acceptance 34 Send Your Own Number 35 Signal strength 8 Special characters 18, 54 Speed Dial 13 Stop your phone
-
 1
1 -
 2
2 -
 3
3 -
 4
4 -
 5
5 -
 6
6 -
 7
7 -
8
-
9
-
10
-
11
-
12
-
13
-
14
-
15
-
16
-
17
-
18
-
19
-
20
-
21
-
22
-
23
-
24
-
25
-
26
-
27
-
28
-
29
-
30
-
31
-
32
-
33
-
34
-
35
-
36
-
37
-
38
-
39
-
40
-
41
-
42
-
43
-
44
-
45
-
46
-
47
-
48
-
49
-
50
-
51
-
52
-
53
-
54
-
55
-
56
-
57
-
58
-
59
-
60
-
61
-
62
-
63
-
64
-
65
-
66
-
67
-
68
-
69
-
70
-
71
-
72
-
73
-
74
-
75
-
76
-
77
 |
 |