Nokia N90 User Guide - Page 42
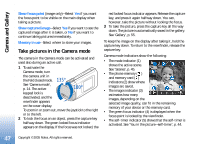
Camera and Gallery, Camera, Take pictures in the Imaging mode
 |
View all Nokia N90 manuals
Add to My Manuals
Save this manual to your list of manuals |
Page 42 highlights
Camera and Gallery Camera and Gallery Camera The Nokia N90 device supports an image capture resolution of 1600 x 1200 pixels. The image resolution in these materials may appear different. To activate the camera, activate the Imaging mode. See 'Imaging mode', p.13. The camera starts, and you can see the view to be captured. Warning! You cannot make emergency calls in the Imaging mode because the keypad is not active. To make an emergency call, activate the Fold open mode. If the camera is in Video mode, open the image mode by selecting Options > Image mode. The images are automatically saved in the gallery in .jpeg format. You can send images in a multimedia message, as an e-mail attachment or using a Bluetooth connection. Take pictures in the Imaging mode To make lighting and colour adjustments before taking a picture, press the joystick, and select Flash, White balance, Exposure value, or Colour tone. See 'Setup settings-Adjust colour and lighting', p. 45. To select a scene, press the joystick, and select Scene. See 'Scenes', p. 45. Your device also has a swing axis camera, which makes capturing views in different situations easier. You can turn the camera unit clockwise and counterclockwise. See 'Camera mode', p. 14. Options before taking a picture are Video mode, Go to Gallery, Image setup, Sequence mode/Normal mode, Activate self-timer, Settings, and Help. To lock the focus on an object, press the capture key halfway down. The green locked focus indicator appears on the display. If the focus was not locked, the red locked focus indicator appears. Release the capture key, and press it again halfway down. You can, however, take the picture without locking the focus. To take a picture, press the capture key. Do not move the device before the image is saved. The image is saved 42 Copyright © 2005 Nokia. All rights reserved.
-
 1
1 -
2
-
3
-
4
-
5
-
6
-
7
-
8
-
9
-
10
-
11
-
12
-
13
-
14
-
15
-
16
-
17
-
18
-
19
-
20
-
21
-
22
-
23
-
24
-
25
-
26
-
27
-
28
-
29
-
30
-
31
-
32
-
33
-
34
-
35
-
36
-
 37
37 -
 38
38 -
 39
39 -
 40
40 -
 41
41 -
 42
42 -
 43
43 -
 44
44 -
 45
45 -
 46
46 -
 47
47 -
48
-
49
-
50
-
51
-
52
-
53
-
54
-
55
-
56
-
57
-
58
-
59
-
60
-
61
-
62
-
63
-
64
-
65
-
66
-
67
-
68
-
69
-
70
-
71
-
72
-
73
-
74
-
75
-
76
-
77
-
78
-
79
-
80
-
81
-
82
-
83
-
84
-
85
-
86
-
87
-
88
-
89
-
90
-
91
-
92
-
93
-
94
-
95
-
96
-
97
-
98
-
99
-
100
-
101
-
102
-
103
-
104
-
105
-
106
-
107
-
108
-
109
-
110
-
111
-
112
-
113
-
114
-
115
-
116
-
117
-
118
-
119
-
120
-
121
-
122
-
123
-
124
-
125
-
126
-
127
-
128
-
129
-
130
-
131
-
132
 |
 |
