Nokia N90 User Guide - Page 68
Receive MMS and e-mail settings, Enter the MMS settings manually - service manual
 |
View all Nokia N90 manuals
Add to My Manuals
Save this manual to your list of manuals |
Page 68 highlights
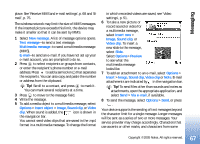
Messaging language options like Chinese, take up more space limiting the number of characters that can be sent in a single message. In the navigation bar, you can see the message length indicator counting backwards. For example, 10 (2) means that you can still add 10 characters for the text to be sent as two messages. Note: E-mail messages are automatically placed in Outbox before sending. If sending does not succeed, the e-mail is left in the Outbox with the Failed status. Tip! In Messaging you can also create presentations and send them in a multimedia message. In the multimedia message editor view, select Options > Create presentation (shown only if MMS creation mode is set to Guided or Free). See 'Multimedia messages', p. 74. Tip! When you send a multimedia message to an e-mail address or a device that supports the receiving of large images, use the larger image size. If you are not sure of the receiving device, or the network does not support sending large files, it is recommended that you use a smaller image size or a sound clip that is no longer than 15 seconds. To change the setting, select Options > Settings > Multimedia message > Image size in the Messaging main view. Receive MMS and e-mail settings You may receive the settings in a text message from your network operator or service provider. See 'Data and settings', p. 69. For availability of and subscription to data services, contact your network operator or service provider. Follow the instructions given by your service provider. Enter the MMS settings manually: 1 Select Tools > Settings > Connection > Access points, and define the settings for a multimedia messaging access point. See 'Connection settings', p. 107. 2 Select Messaging > Options > Settings > Multimedia message > Access point in use and the access point you created to be used as the preferred connection. See also 'Multimedia messages', p. 74. Before you can send, receive, retrieve, reply to, and forward e-mail, you must do the following: • Configure an Internet access point (IAP) correctly. See 'Connection settings', p. 107. • Define your e-mail settings correctly. See 'E-mail', p. 75. You need to have a separate e-mail account. Follow the instructions given by your remote mailbox and Internet service provider (ISP). 68 Copyright © 2005 Nokia. All rights reserved.
-
 1
1 -
2
-
3
-
4
-
5
-
6
-
7
-
8
-
9
-
10
-
11
-
12
-
13
-
14
-
15
-
16
-
17
-
18
-
19
-
20
-
21
-
22
-
23
-
24
-
25
-
26
-
27
-
28
-
29
-
30
-
31
-
32
-
33
-
34
-
35
-
36
-
37
-
38
-
39
-
40
-
41
-
42
-
43
-
44
-
45
-
46
-
47
-
48
-
49
-
50
-
51
-
52
-
53
-
54
-
55
-
56
-
57
-
58
-
59
-
60
-
61
-
62
-
 63
63 -
 64
64 -
 65
65 -
 66
66 -
 67
67 -
 68
68 -
 69
69 -
 70
70 -
 71
71 -
 72
72 -
 73
73 -
74
-
75
-
76
-
77
-
78
-
79
-
80
-
81
-
82
-
83
-
84
-
85
-
86
-
87
-
88
-
89
-
90
-
91
-
92
-
93
-
94
-
95
-
96
-
97
-
98
-
99
-
100
-
101
-
102
-
103
-
104
-
105
-
106
-
107
-
108
-
109
-
110
-
111
-
112
-
113
-
114
-
115
-
116
-
117
-
118
-
119
-
120
-
121
-
122
-
123
-
124
-
125
-
126
-
127
-
128
-
129
-
130
-
131
-
132
 |
 |