Olympus C3020 C-3020 Zoom Reference Manual (5.6 MB) - Page 177
Transferring images to a computer — Downloading, Windows - camedia manual
 |
UPC - 050332135192
View all Olympus C3020 manuals
Add to My Manuals
Save this manual to your list of manuals |
Page 177 highlights
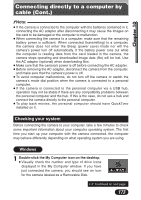
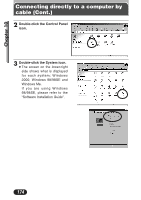
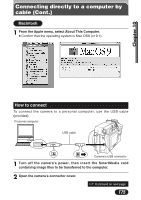
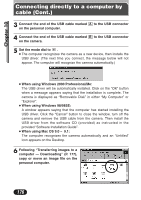
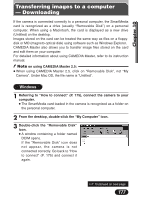
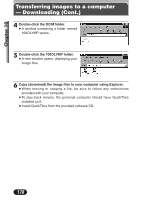
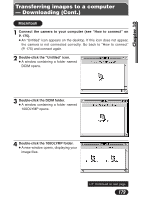
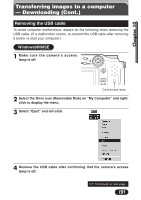
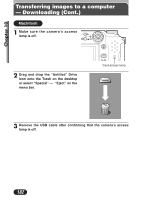
Chapter 10 Transferring images to a computer - Downloading If the camera is connected correctly to a personal computer, the SmartMedia card is recognized as a drive (usually "Removable Disk") on a personal computer. When using a Macintosh, the card is displayed as a new drive (Untitled) on the desktop. Images stored on the card can be treated the same way as files on a floppydisk or MO (magneto-optical disk) using software such as Windows Explorer. CAMEDIA Master also allows you to transfer image files stored on the card and edit them on your computer. For detailed information about using CAMEDIA Master, refer to its instruction manual. Note on using CAMEDIA Master 2.5: ● When using CAMEDIA Master 2.5, click on "Removable Disk", not "My Camera". Under Mac OS, the file name is "Untitled". Windows 1 Referring to "How to connect" (P. 175), connect the camera to your computer. ● The SmartMedia card loaded in the camera is recognized as a folder on the personal computer. 2 From the desktop, double-click the "My Computer" icon. 3 Double-click the "Removable Disk" icon. ● A window containing a folder named DCIM opens. If the "Removable Disk" icon does not appear, the camera is not connected correctly. Go back to "How to connect" (P. 175) and connect it again. ~ Continued on next page 177
-
 1
1 -
2
-
3
-
4
-
5
-
6
-
7
-
8
-
9
-
10
-
11
-
12
-
13
-
14
-
15
-
16
-
17
-
18
-
19
-
20
-
21
-
22
-
23
-
24
-
25
-
26
-
27
-
28
-
29
-
30
-
31
-
32
-
33
-
34
-
35
-
36
-
37
-
38
-
39
-
40
-
41
-
42
-
43
-
44
-
45
-
46
-
47
-
48
-
49
-
50
-
51
-
52
-
53
-
54
-
55
-
56
-
57
-
58
-
59
-
60
-
61
-
62
-
63
-
64
-
65
-
66
-
67
-
68
-
69
-
70
-
71
-
72
-
73
-
74
-
75
-
76
-
77
-
78
-
79
-
80
-
81
-
82
-
83
-
84
-
85
-
86
-
87
-
88
-
89
-
90
-
91
-
92
-
93
-
94
-
95
-
96
-
97
-
98
-
99
-
100
-
101
-
102
-
103
-
104
-
105
-
106
-
107
-
108
-
109
-
110
-
111
-
112
-
113
-
114
-
115
-
116
-
117
-
118
-
119
-
120
-
121
-
122
-
123
-
124
-
125
-
126
-
127
-
128
-
129
-
130
-
131
-
132
-
133
-
134
-
135
-
136
-
137
-
138
-
139
-
140
-
141
-
142
-
143
-
144
-
145
-
146
-
147
-
148
-
149
-
150
-
151
-
152
-
153
-
154
-
155
-
156
-
157
-
158
-
159
-
160
-
161
-
162
-
163
-
164
-
165
-
166
-
167
-
168
-
169
-
170
-
171
-
 172
172 -
 173
173 -
 174
174 -
 175
175 -
 176
176 -
 177
177 -
 178
178 -
 179
179 -
 180
180 -
 181
181 -
 182
182 -
183
-
184
-
185
-
186
-
187
-
188
-
189
-
190
-
191
-
192
-
193
-
194
-
195
-
196
-
197
-
198
-
199
-
200
-
201
-
202
-
203
-
204
-
205
-
206
 |
 |