Olympus DM 520 DM-420 Detailed Instructions (English) - Page 49
Press the, button, adjust the start/stop actuation, level.
 |
UPC - 807360860868
View all Olympus DM 520 manuals
Add to My Manuals
Save this manual to your list of manuals |
Page 49 highlights
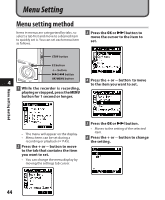
Menu setting method 2 Press the 9 or 0 button VCVA standby monitor setting: adjust the start/stop actuation level. When [Standby] is set to [On] with the menu setting, the recording will not be output • The VCVA level can be set to any of 15 different values. • The higher the value, the more sensitive the recorder to sounds. At the highest value, even the faintest sound will activate recording. a Level meter (varies according to the from the earphone while in VCVA standby. When you monitor your recording with the earphone connected, you can check whether VCVA is launched or not by checking if an audio is output. [On]: Enables the Standby Monitor function. sound volume being recorded) b Start level (moves to the right/left [Off]: Disables this function. according to the set level) c Start level/Recording level switch button (Only when [VCVA]:[On],[Rec Timer Rec Level]:[Manual] is set, it is displayed.) • Press the F1 button to change the recording level during VCVA Refer to "Timer Recording [Timer Rec]" (☞ P.60). 4 recording. The recording level can be adjusted. Rec Scene Refer to "Setting the Recording Scene [Rec Scene]" (☞ P.62). Menu setting method a c b • The start/stop actuation level also varies depending on the selected microphone sensitivity mode (☞ P.47). • If the starting level is not adjusted within 2 seconds, the display will return to the previous. • If the surrounding noise is loud, the starting sensitivity of the VCVA can be adjusted according to the recording situation. • To ensure successful recordings, prior testing and adjustment of the start/stop actuation level is recommended. 49
-
 1
1 -
2
-
3
-
4
-
5
-
6
-
7
-
8
-
9
-
10
-
11
-
12
-
13
-
14
-
15
-
16
-
17
-
18
-
19
-
20
-
21
-
22
-
23
-
24
-
25
-
26
-
27
-
28
-
29
-
30
-
31
-
32
-
33
-
34
-
35
-
36
-
37
-
38
-
39
-
40
-
41
-
42
-
43
-
 44
44 -
 45
45 -
 46
46 -
 47
47 -
 48
48 -
 49
49 -
 50
50 -
 51
51 -
 52
52 -
 53
53 -
 54
54 -
55
-
56
-
57
-
58
-
59
-
60
-
61
-
62
-
63
-
64
-
65
-
66
-
67
-
68
-
69
-
70
-
71
-
72
-
73
-
74
-
75
-
76
-
77
-
78
-
79
-
80
-
81
-
82
-
83
-
84
-
85
-
86
-
87
-
88
-
89
-
90
-
91
-
92
-
93
-
94
-
95
-
96
-
97
-
98
-
99
-
100
-
101
-
102
-
103
-
104
-
105
-
106
-
107
-
108
-
109
-
110
-
111
-
112
-
113
-
114
-
115
-
116
-
117
-
118
-
119
-
120
-
121
-
122
-
123
-
124
-
125
-
126
-
127
-
128
 |
 |
