Olympus DM 520 DM-420 Detailed Instructions (English) - Page 76
Installing Software
 |
UPC - 807360860868
View all Olympus DM 520 manuals
Add to My Manuals
Save this manual to your list of manuals |
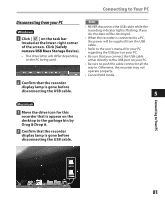
Page 76 highlights
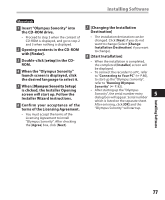
Installing Software Before you connect the recorder to your PC and use it, you must first install the "Olympus Sonority" software from the included Software CD. Be sure to confirm the following before installation: • Exit all running applications. • You need to log on as an Administrator. Windows 1 Insert "Olympus Sonority" into the CD-ROM drive. 6 Confirm your acceptance of the terms of the Licensing Agreement. • The installation program will start automatically. Once the program starts, jump to step 4. If it does not, follow the procedures in steps 2 and 3. • You must accept the terms of the Licensing Agreement to install "Olympus Sonority". After checking the [Agree] box, click [Next]. 2 Opening contents in the CD-ROM 7 [Registration of User Registration with [Explorer]. Information] 3 Double-click [Setup] in the CD- 5 ROM. 4 When the "Olympus Sonority" launch screen is displayed, click the desired language to select it. 5 When [Olympus Sonority Setup] is clicked, the Installer Opening screen will start up. Follow the Installer Wizard instructions. • Please enter your name, company name and serial number which is listed on the separate sheet. Click [Next] after entering. 8 [Select Setup Type] • The installation destination can be changed. Click [Next] if you do not want to change (Select [Custom] if you want to change). 9 [Start Installation] • Click [Install] to start installing. Do not carry out other operations before the installation is completed and the [Complete] screen is displayed. 10 [Installation Complete] • When the installation is completed, the completed [Install Shield] screen will be displayed. • To connect the recorder to a PC, refer to "Connecting to your PC" (+ P.80), to start up the Olympus Sonority, refer to "Running Olympus Sonority" (+ P. 82). Installing Software 76
-
 1
1 -
2
-
3
-
4
-
5
-
6
-
7
-
8
-
9
-
10
-
11
-
12
-
13
-
14
-
15
-
16
-
17
-
18
-
19
-
20
-
21
-
22
-
23
-
24
-
25
-
26
-
27
-
28
-
29
-
30
-
31
-
32
-
33
-
34
-
35
-
36
-
37
-
38
-
39
-
40
-
41
-
42
-
43
-
44
-
45
-
46
-
47
-
48
-
49
-
50
-
51
-
52
-
53
-
54
-
55
-
56
-
57
-
58
-
59
-
60
-
61
-
62
-
63
-
64
-
65
-
66
-
67
-
68
-
69
-
70
-
 71
71 -
 72
72 -
 73
73 -
 74
74 -
 75
75 -
 76
76 -
 77
77 -
 78
78 -
 79
79 -
 80
80 -
 81
81 -
82
-
83
-
84
-
85
-
86
-
87
-
88
-
89
-
90
-
91
-
92
-
93
-
94
-
95
-
96
-
97
-
98
-
99
-
100
-
101
-
102
-
103
-
104
-
105
-
106
-
107
-
108
-
109
-
110
-
111
-
112
-
113
-
114
-
115
-
116
-
117
-
118
-
119
-
120
-
121
-
122
-
123
-
124
-
125
-
126
-
127
-
128
 |
 |
