Onkyo TX-NR808 Owner Manual - Page 27
Changing the Input Display, Using Headphones, Using Easy Macros, ACTIVITIES, ALL OFF, TV/CD, VCR/DVR - remote codes
 |
View all Onkyo TX-NR808 manuals
Add to My Manuals
Save this manual to your list of manuals |
Page 27 highlights
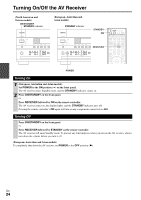
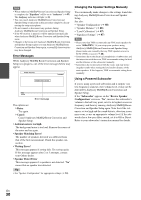
Note *1 If Pure Audio or Direct listening mode is selected, "Dynamic EQ" and "Dynamic Volume" cannot be selected. *2 Only when you have selected "Custom" in the "Picture Mode" (➔ 53), pressing ENTER allows you to adjust the following items via the Home menu; "Brightness", "Contrast", "Hue" and "Saturation". Press RETURN to return to the original Home menu. *3 Depending on the input source and listening mode, not all channels shown here output the sound. *4 When you have entered a custom name in "Name Edit" (➔ 52), the input source is displayed with that name. But even if not, the component name may be displayed if the AV receiver receives it via HDMI connection (➔ 18). *5 For the PORT input selector, the name of Universal Port Option Dock will be displayed. Changing the Input Display When you connect an V-capable Onkyo component, you must configure the input display so that V can work properly. This setting can be done only from the front panel. 1 Press TV/CD, GAME or VCR/DVR so that "TV/ CD", "GAME" or "VCR/DVR" appears on the display. Using Headphones Connect a pair of stereo headphones with a standard plug (1/4 inch or 6.3 mm) to the PHONES jack. Note • Always turn down the volume before connecting your head- phones. • While the headphones plug is inserted in the PHONES jack, the Headphone indicator, speaker/channel indicator FL and FR lights. (The Powered Zone 2 speakers are not turned off.) • When you connect a pair of headphones, the listening mode is set to Stereo, unless it's already set to Stereo, Mono, Direct, or Pure Audio. • Only the Stereo, Direct, Pure Audio, and Mono listening modes can be used with headphones. Using Easy Macros Using the Easy macro command in the Easy macro mode, you can sequentially operate Onkyo components with simple commands by simply pressing one button. These commands are user-specifiable (➔ 85) and the default actions are described below. Press ACTIVITIES to start the Easy macro command. Once the AV receiver has entered the normal macro mode, all of ACTIVITIES will automatically switch to the normal macro mode. In this case, pressing ALL OFF will set only the AV receiver to Standby mode. → → 2 Press and hold down TV/CD, GAME or VCR/DVR (about 3 seconds) to change the input display. Repeat this step to select "MD", "CDR", "DOCK" or "TAPE". For the TV/CD input selector, the input display changes in this order: TV/CD → MD → CDR TAPE DOCK For the GAME input selector, the setting changes in this order: GAME ↔ DOCK For the VCR/DVR input selector, the setting changes in this order: VCR/DVR ↔ DOCK → Press MY MOVIE, MY TV, or MY MUSIC. MY MOVIE (default): 1. The TV connected to the AV receiver is turned on. 2. The Onkyo DVD player connected to the AV receiver is turned on. 3. The AV receiver is turned on. 4. The input selector of the AV receiver is set to "BD/DVD". 5. The player starts playback.*1 MY TV (default): 1. The TV connected to the AV receiver is turned on. 2. The cable set-top box connected to the AV receiver is turned on. 3. The AV receiver is turned on. 4. The input selector of the AV receiver is set to "CBL/SAT". You can enjoy cable TV. Note • DOCK can be selected for the TV/CD, GAME or VCR/DVR input selector, but not at the same time. • Enter the appropriate remote control code before using the remote controller for the first time (➔ 80). En 27
-
 1
1 -
2
-
3
-
4
-
5
-
6
-
7
-
8
-
9
-
10
-
11
-
12
-
13
-
14
-
15
-
16
-
17
-
18
-
19
-
20
-
21
-
 22
22 -
 23
23 -
 24
24 -
 25
25 -
 26
26 -
 27
27 -
 28
28 -
 29
29 -
 30
30 -
 31
31 -
 32
32 -
33
-
34
-
35
-
36
-
37
-
38
-
39
-
40
-
41
-
42
-
43
-
44
-
45
-
46
-
47
-
48
-
49
-
50
-
51
-
52
-
53
-
54
-
55
-
56
-
57
-
58
-
59
-
60
-
61
-
62
-
63
-
64
-
65
-
66
-
67
-
68
-
69
-
70
-
71
-
72
-
73
-
74
-
75
-
76
-
77
-
78
-
79
-
80
-
81
-
82
-
83
-
84
-
85
-
86
-
87
-
88
-
89
-
90
-
91
-
92
-
93
-
94
-
95
-
96
-
97
-
98
-
99
-
100
 |
 |
