Palm M130 Handbook - Page 138
IR HotSync operations, Preparing your computer for infrared communication
 |
UPC - 805931003812
View all Palm M130 manuals
Add to My Manuals
Save this manual to your list of manuals |
Page 138 highlights
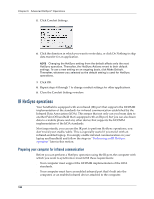
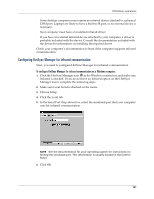
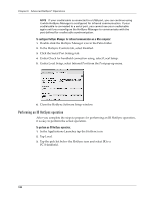
Chapter 6 Advanced HotSync® Operations 5. Click Conduit Settings. 6. Click the direction in which you want to write data, or click Do Nothing to skip data transfer for an application. NOTE Changing the HotSync setting from the default affects only the next HotSync operation. Thereafter, the HotSync Actions revert to their default settings. To use a new setting on an ongoing basis, click Make Default. Thereafter, whatever you selected as the default setting is used for HotSync operations. 7. Click OK. 8. Repeat steps 4 through 7 to change conduit settings for other applications. 9. Close the Conduit Settings window. IR HotSync operations Your handheld is equipped with an infrared (IR) port that supports the IrCOMM implementation of the standards for infrared communication established by the Infrared Data Association (IrDA). This means that not only can you beam data to another Palm OS handheld that's equipped with an IR port, but you can also beam data to a mobile phone and any other device that supports the IrCOMM implementation of the IrDA standards. Most importantly, you can use the IR port to perform HotSync operations; you don't need your cradle/cable. This is especially useful if you travel with an infrared-enabled laptop. You simply enable infrared communication on your laptop and handheld and follow the steps in "Performing an IR HotSync operation" later in this section. Preparing your computer for infrared communication Before you can perform a HotSync operation using the IR port, the computer with which you want to synchronize must fulfill these requirements: s Your computer must support the IrCOMM implementation of the IrDA standards. s Your computer must have an enabled infrared port that's built into the computer, or an enabled infrared device attached to the computer. 130
-
 1
1 -
2
-
3
-
4
-
5
-
6
-
7
-
8
-
9
-
10
-
11
-
12
-
13
-
14
-
15
-
16
-
17
-
18
-
19
-
20
-
21
-
22
-
23
-
24
-
25
-
26
-
27
-
28
-
29
-
30
-
31
-
32
-
33
-
34
-
35
-
36
-
37
-
38
-
39
-
40
-
41
-
42
-
43
-
44
-
45
-
46
-
47
-
48
-
49
-
50
-
51
-
52
-
53
-
54
-
55
-
56
-
57
-
58
-
59
-
60
-
61
-
62
-
63
-
64
-
65
-
66
-
67
-
68
-
69
-
70
-
71
-
72
-
73
-
74
-
75
-
76
-
77
-
78
-
79
-
80
-
81
-
82
-
83
-
84
-
85
-
86
-
87
-
88
-
89
-
90
-
91
-
92
-
93
-
94
-
95
-
96
-
97
-
98
-
99
-
100
-
101
-
102
-
103
-
104
-
105
-
106
-
107
-
108
-
109
-
110
-
111
-
112
-
113
-
114
-
115
-
116
-
117
-
118
-
119
-
120
-
121
-
122
-
123
-
124
-
125
-
126
-
127
-
128
-
129
-
130
-
131
-
132
-
 133
133 -
 134
134 -
 135
135 -
 136
136 -
 137
137 -
 138
138 -
 139
139 -
 140
140 -
 141
141 -
 142
142 -
 143
143 -
144
-
145
-
146
-
147
-
148
-
149
-
150
-
151
-
152
-
153
-
154
-
155
-
156
-
157
-
158
-
159
-
160
-
161
-
162
-
163
-
164
-
165
-
166
-
167
-
168
-
169
-
170
-
171
-
172
-
173
-
174
-
175
-
176
-
177
-
178
-
179
-
180
-
181
-
182
-
183
-
184
-
185
-
186
-
187
-
188
-
189
-
190
-
191
-
192
-
193
-
194
-
195
-
196
-
197
-
198
-
199
-
200
-
201
-
202
-
203
-
204
-
205
-
206
-
207
-
208
-
209
-
210
 |
 |
