Panasonic 55 Professional Display for Entry-Level Digital Signage Operating In - Page 26
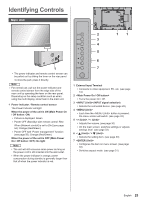
Remote Control Transmitter, Standby ON/OFF button
 |
View all Panasonic 55 Professional Display for Entry-Level Digital Signage manuals
Add to My Manuals
Save this manual to your list of manuals |
Page 26 highlights
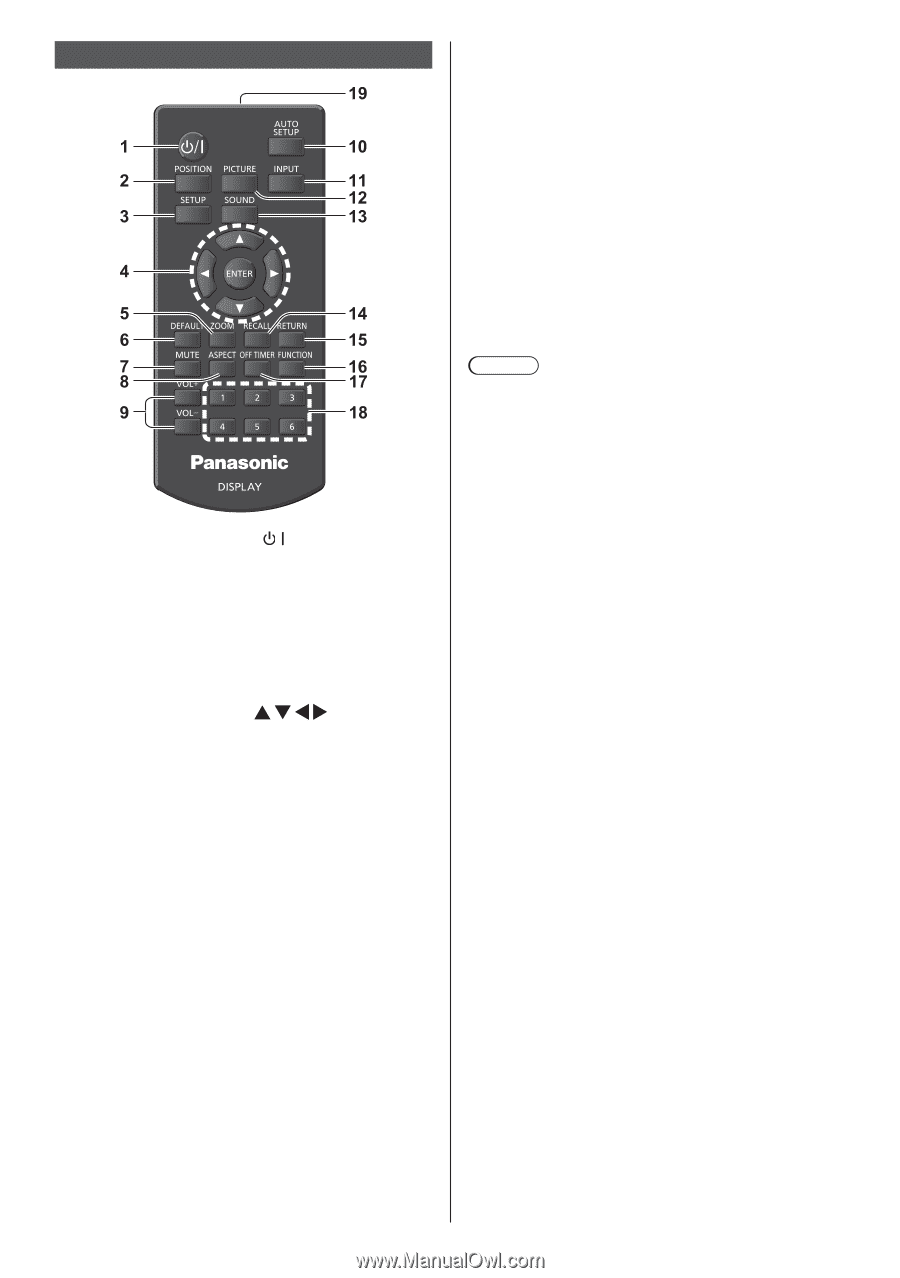
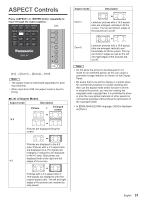
Remote Control Transmitter 1 Standby (ON/OFF) button ( / ) ● Turns the power on or off when the Display is turned on at the . (see page 27) 2 POSITION (see page 35) 3 SETUP (see page 45) 4 ENTER / Cursor buttons ( ) ● Used to operate the menu screens. (see page 33) 5 ZOOM Enters the digital zoom mode. (see page 32) 6 DEFAULT ● Resets the settings of picture, sound, etc., to defaults. (see page 35, 37, 38) 7 MUTE ● Sound mute on / off. (see page 30) 8 ASPECT ● Adjusts the aspect. (see page 31) 9 VOL + / VOL - ● Adjusts sound volume level. (see page 30) 10 AUTO SETUP ● Automatically adjusts the position/size of the screen. (see page 35) 11 INPUT ● Switches input to display on the screen. (see page 29) 12 PICTURE (see page 38) 13 SOUND (see page 37) 26 English 14 RECALL ● Displays the current setting status of Input mode, Aspect mode, etc. (see page 29) 15 RETURN ● Used to return to the previous menu. (see page 33) 16 FUNCTION (see page 58) 17 OFF TIMER ● Switches to stand-by after a fixed period. (see page 30) 18 Numeric buttons (1 - 6) ● Used as shortcut buttons by assigning frequently used operations. (see page 59) 19 Signal emission Note ● In this manual, buttons of the remote control and the unit are indicated as < >. (Example: .) The operation is mainly explained indicating the remote control buttons but you can also operate with the buttons on the unit when there are the same buttons.
-
 1
1 -
2
-
3
-
4
-
5
-
6
-
7
-
8
-
9
-
10
-
11
-
12
-
13
-
14
-
15
-
16
-
17
-
18
-
19
-
20
-
 21
21 -
 22
22 -
 23
23 -
 24
24 -
 25
25 -
 26
26 -
 27
27 -
 28
28 -
 29
29 -
 30
30 -
 31
31 -
32
-
33
-
34
-
35
-
36
-
37
-
38
-
39
-
40
-
41
-
42
-
43
-
44
-
45
-
46
-
47
-
48
-
49
-
50
-
51
-
52
-
53
-
54
-
55
-
56
-
57
-
58
-
59
-
60
-
61
-
62
-
63
-
64
-
65
-
66
-
67
-
68
-
69
-
70
-
71
-
72
-
73
-
74
-
75
-
76
-
77
-
78
-
79
-
80
-
81
-
82
-
83
-
84
-
85
-
86
-
87
-
88
-
89
-
90
-
91
-
92
-
93
-
94
-
95
-
96
-
97
-
98
-
99
-
100
-
101
-
102
-
103
-
104
-
105
-
106
-
107
-
108
 |
 |