Panasonic 55 Professional Display for Entry-Level Digital Signage Operating In - Page 32
Digital ZOOM
 |
View all Panasonic 55 Professional Display for Entry-Level Digital Signage manuals
Add to My Manuals
Save this manual to your list of manuals |
Page 32 highlights
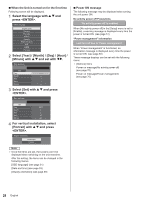
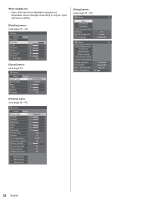
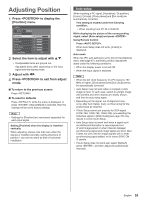
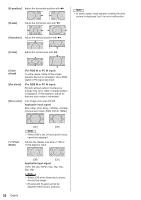
Digital ZOOM Select the screen areas (25 areas) to zoom in, and zoom in the selected image areas ×2, ×3 or ×4. (Use the remote control. The main unit's buttons cannot be used for operation.) Enter Select Exit Digital Zoom 1 Set the digital zoom mode. Press . RETURN Exit ENTER ×1 The screen aspect is set to [16:9], and the digital zoom operation guide is displayed. 2 Select the image areas to zoom in. Select pressing . RETURN Exit ENTER ×1 Digital Zoom operation guide 3 Switch the zoom ratio for the screen areas. Switches every time is pressed. Exit ×1 ×1 Exit ×2 ×2 Exit ×3 ×3 Exit ×4 ×4 ● If no operation is performed for approx. 60 seconds when the zoom ratio for the screen is "×1", the unit exits the zoom mode. ● If no operation is performed for approx. 3 seconds when the zoom ratio for the screen is "×2", "×3" or "×4", the digital zoom operation guide display disappears. Pressing any of the buttons displays the guide again. 4 Exit the digital zoom mode. Press to exit the mode. The screen returns to the previous state just before entering the digital zoom mode, and the digital zoom operation guide display disappears. ● Press any of the following buttons to exit the mode. Then, the operation of the pressed button is performed. Remote Control: ~ Unit: ● When the screen saver timer starts up, the digital zoom mode finishes. ● When the power is turned OFF, a force-quit is performed. •• When the power is turned OFF by pressing the standby (ON/OFF) button of the remote control. •• When the display is turned OFF at the •• When the power is turned OFF by the off-timer •• When the power is turned OFF by [No signal power off] or [Power management]. Note ● In the following cases, the digital zoom mode is not available. •• When [Multi display setting] is [On] •• When the screen saver is in operation •• When USB input is selected. ● The zoomed image is rougher than the original image. 32 English
-
 1
1 -
2
-
3
-
4
-
5
-
6
-
7
-
8
-
9
-
10
-
11
-
12
-
13
-
14
-
15
-
16
-
17
-
18
-
19
-
20
-
21
-
22
-
23
-
24
-
25
-
26
-
 27
27 -
 28
28 -
 29
29 -
 30
30 -
 31
31 -
 32
32 -
 33
33 -
 34
34 -
 35
35 -
 36
36 -
 37
37 -
38
-
39
-
40
-
41
-
42
-
43
-
44
-
45
-
46
-
47
-
48
-
49
-
50
-
51
-
52
-
53
-
54
-
55
-
56
-
57
-
58
-
59
-
60
-
61
-
62
-
63
-
64
-
65
-
66
-
67
-
68
-
69
-
70
-
71
-
72
-
73
-
74
-
75
-
76
-
77
-
78
-
79
-
80
-
81
-
82
-
83
-
84
-
85
-
86
-
87
-
88
-
89
-
90
-
91
-
92
-
93
-
94
-
95
-
96
-
97
-
98
-
99
-
100
-
101
-
102
-
103
-
104
-
105
-
106
-
107
-
108
 |
 |
