Panasonic AG-AC160A Operating Instructions Advanced - Page 51
Charging the built-in battery/setting the time code, Charging the built-in battery
 |
View all Panasonic AG-AC160A manuals
Add to My Manuals
Save this manual to your list of manuals |
Page 51 highlights
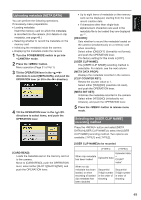
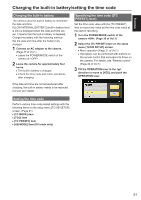
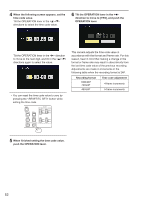
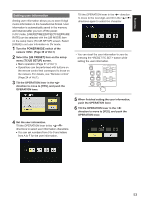
Shooting Charging the built-in battery/setting the time code Charging the built-in battery The camera uses the built-in battery to remember the date and time. If [LOW INTERNAL BATTERY] (built-in battery level is low) is displayed when the date and time are set, it means that the built-in battery is depleted. Charge the battery with the following method. Set the date and time after the battery fully charged. 1 Connect an AC adaptor to the camera. (Page 27 of Vol.1) ••Leave the POWER/MODE switch of the camera at . 2 Leave the camera for approximately four hours. ••The built-in battery is charged. ••Check the time code and menu operations after charging. Specifying the time code ([TC PRESET] item) Set the time code value with the [TC PRESET] item to record any value as the time code value at the start of recording. 1 Turn the POWER/MODE switch of the camera . (Page 30 of Vol.1) 2 Select the [TC PRESET] item on the setup menu [TC/UB SETUP] screen. ••Menu operation (Page 31 of Vol.1) ••Operations can be performed with buttons on the remote control that correspond to those on the camera. For details, see "Remote control" (Page 24 of Vol.1). 3 Tilt the OPERATION lever in the < > direction to move to [YES], and push the OPERATION lever. If the date and time are not remembered after charging, the built-in battery needs to be replaced. Consult your dealer. Setting the time code Perform various time code related settings with the following items on the setup menu [TC/UB SETUP] screen. (Page 91) ••[TC MODE] item ••[TCG] item ••[TC PRESET] item ••[UB MODE] item (DV mode only) 51
-
 1
1 -
2
-
3
-
4
-
5
-
6
-
7
-
8
-
9
-
10
-
11
-
12
-
13
-
14
-
15
-
16
-
17
-
18
-
19
-
20
-
21
-
22
-
23
-
24
-
25
-
26
-
27
-
28
-
29
-
30
-
31
-
32
-
33
-
34
-
35
-
36
-
37
-
38
-
39
-
40
-
41
-
42
-
43
-
44
-
45
-
 46
46 -
 47
47 -
 48
48 -
 49
49 -
 50
50 -
 51
51 -
 52
52 -
 53
53 -
 54
54 -
 55
55 -
 56
56 -
57
-
58
-
59
-
60
-
61
-
62
-
63
-
64
-
65
-
66
-
67
-
68
-
69
-
70
-
71
-
72
-
73
-
74
-
75
-
76
-
77
-
78
-
79
-
80
-
81
-
82
-
83
-
84
-
85
-
86
-
87
-
88
-
89
-
90
-
91
-
92
-
93
-
94
-
95
-
96
-
97
-
98
-
99
-
100
-
101
-
102
-
103
-
104
-
105
-
106
-
107
-
108
-
109
-
110
 |
 |