Panasonic DMC LZ2 Digital Still Camera - Page 74
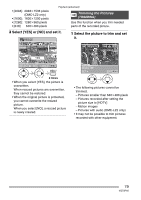
Select the pictures and set the number, of prints.
 |
UPC - 037988985074
View all Panasonic DMC LZ2 manuals
Add to My Manuals
Save this manual to your list of manuals |
Page 74 highlights
Playback (advanced) ∫ Single setting ∫ To cancel all settings Select the picture and set the number of Select [YES] to cancel all settings. prints. CANCEL ALL DPOF DPOF SET THIS 1 100_0001 1/18 CANCEL ALL DPOF PRINT SETTINGS? NO YES COUNT SELECT 1 DATE DISPLAY EXIT MENU MENU SELECT SET MENU 2 times • The number of prints can be set from 0 to 999. • The number of prints icon [ ] appears. • When the number of prints is set to "0", DPOF print setting is canceled. ∫ Multi setting Select the pictures and set the number of prints. DPOF SET MULTI 7 8 1 9 • When a card is not inserted, DPOF print settings on the built-in memory are canceled. When a card is inserted, DPOF print settings on the card are canceled. ∫ To print the date You can set/cancel the printing with the recorded date by pressing the [DISPLAY] button after setting the number of prints. DPOF SET THIS 1 100_0001 DATE 1/18 10 COUNT SELECT 11 12 1 DATE DISPLAY EXIT MENU MENU 2 times • Repeat the above procedure. • The number of prints can be set from 0 to 999. • The number of prints icon [ ] appears. • When the number of prints is set to "0", DPOF print setting is canceled. COUNT SELECT 1 DATE DISPLAY EXIT MENU • The date print icon [ DATE ] appears. • When using the software "SD Viewer for DSC" in the CD-ROM (supplied), you can print pictures with the date by setting the position on the print preview screen. For details, refer to the separate operating instructions about PC connection. • When you go to a photo studio for digital printing, be sure to order the printing of the date additionally if required. 74 VQT0P65
-
 1
1 -
2
-
3
-
4
-
5
-
6
-
7
-
8
-
9
-
10
-
11
-
12
-
13
-
14
-
15
-
16
-
17
-
18
-
19
-
20
-
21
-
22
-
23
-
24
-
25
-
26
-
27
-
28
-
29
-
30
-
31
-
32
-
33
-
34
-
35
-
36
-
37
-
38
-
39
-
40
-
41
-
42
-
43
-
44
-
45
-
46
-
47
-
48
-
49
-
50
-
51
-
52
-
53
-
54
-
55
-
56
-
57
-
58
-
59
-
60
-
61
-
62
-
63
-
64
-
65
-
66
-
67
-
68
-
 69
69 -
 70
70 -
 71
71 -
 72
72 -
 73
73 -
 74
74 -
 75
75 -
 76
76 -
 77
77 -
 78
78 -
 79
79 -
80
-
81
-
82
-
83
-
84
-
85
-
86
-
87
-
88
-
89
-
90
-
91
-
92
-
93
-
94
-
95
-
96
-
97
-
98
-
99
-
100
-
101
-
102
-
103
-
104
-
105
-
106
-
107
-
108
-
109
-
110
-
111
-
112
-
113
-
114
-
115
-
116
 |
 |
