Panasonic DMRHS2 DMRHS2 User Guide - Page 43
Erase, Re-edit, Press [ENTER]
 |
View all Panasonic DMRHS2 manuals
Add to My Manuals
Save this manual to your list of manuals |
Page 43 highlights
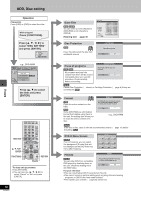
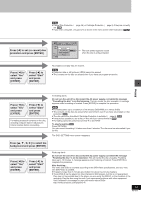
Editing ∫ Add (maximum 999 scenes) Press [3, 4, 2, 1] to select the place where you want to add the scene and press [ENTER]. Press [ENTER] at the start point of the scene. DVD PLAY LIST No.1 Dinosaur PLAY LIST Add Scenes 01 PLAY SELECT 3 ENTER RETURN Start 0 : 00 . 05 Scene No. 5 Start End Next Exit 0 : 00 . 05 End --:--.-- Press [ENTER] at the end point of the scene. Press [3, 4] to select "Exit" and press [ENTER]. The new scene is inserted before the highlighted scene. Press [3, 4] to select "Next" and press [ENTER]. (Repeat to add other scenes.) ∫ Move The scene is moved. Press [3, 4, 2, 1] to select the scene and press [ENTER]. Press [3, 4, 2, 1] to select the position to which you want to move the scene and press [ENTER]. The scene is moved and inserted before the highlighted scene. Repeat to move other scenes. ∫ Re-edit Press [3, 4, 2, 1] to select the scene and press [ENTER]. Press [ENTER] at the start point of the scene. DVD PLAY LIST No.1 Dinosaur PLAY LIST Re-edit Scenes 01 PLAY SELECT ENTER RETURN 33 Start 0 : 00 . 05 Scene No. 1 Prev. Start End Next Exit 0 : 35 . 20 End 0 : 35 . 20 Press [ENTER] at the end point of the scene. Press [3, 4] to select "Exit" and press [ENTER]. The re-edited scene replaces the old one. Press [3, 4] to select "Prev." or "Next" and press [ENTER]. (Repeat to re-edit other scenes.) ∫ Erase Once a scene has been erased, it is irretrievable. Check carefully before proceeding. Press [3, 4, 2, 1] to select the scene and press [ENTER]. Erase Scenes Erase this scene? Yes No SELECT ENTER RETURN Press [2] to select "Yes" and press [ENTER]. ≥ The selected scene is erased from the play list. ≥ The play list itself is erased if you erase all the scenes in it. Repeat to erase other scenes. [Note] ≥Use search and slow-motion to find the start and end points. ≥You cannot specify an end point before a start point, or a start point after an end point. ≥ You may not be able to specify points within 3 seconds of each other. ≥ Play pauses if the end of the last program is reached during this procedure. ≥ You cannot edit still picture images. ≥ Depending on the state of recording, the actual number of play lists or scenes that can be recorded may be less than that specified in this manual. ≥The picture illustration on the right may be shown in the HDD play list scene display. This picture illustration indicates pictures that are 001 permitted to be recorded only once. 43 RQT6570
-
 1
1 -
2
-
3
-
4
-
5
-
6
-
7
-
8
-
9
-
10
-
11
-
12
-
13
-
14
-
15
-
16
-
17
-
18
-
19
-
20
-
21
-
22
-
23
-
24
-
25
-
26
-
27
-
28
-
29
-
30
-
31
-
32
-
33
-
34
-
35
-
36
-
37
-
 38
38 -
 39
39 -
 40
40 -
 41
41 -
 42
42 -
 43
43 -
 44
44 -
 45
45 -
 46
46 -
 47
47 -
 48
48 -
49
-
50
-
51
-
52
-
53
-
54
-
55
-
56
-
57
-
58
-
59
-
60
-
61
-
62
-
63
-
64
-
65
-
66
-
67
-
68
-
69
-
70
-
71
-
72
-
73
-
74
-
75
-
76
 |
 |
