Panasonic EYFMA2C Owner s Manual - Page 15
Operation
 |
View all Panasonic EYFMA2C manuals
Add to My Manuals
Save this manual to your list of manuals |
Page 15 highlights
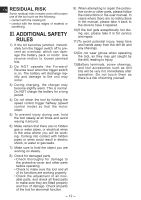
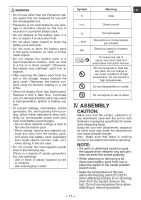
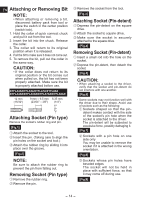
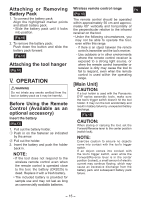
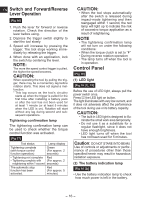
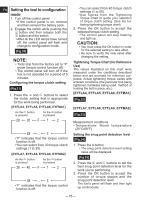
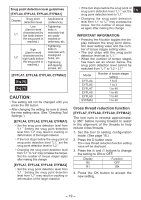
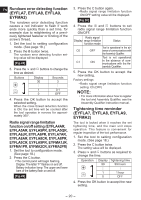
Attaching or Removing Battery Pack 1. To connect the battery pack: Align the highlighted marker points and attach battery pack. • Slide the battery pack until it locks into position. [Fig.10] 2. To remove the battery pack: Push down the button and slide the battery pack forward. [Fig.11] Attaching the tool hanger [Fig.12] V. OPERATION WARNING Do not inhale any smoke emitted from the tool or battery pack as it may be harmful. Before Using the Remote Control (Available as an optional accessory) Insert the battery [Fig.13] 1. Pull out the battery holder. 1 Push in on the fastener as indicated by the arrow. 2 Pull out the holder. 2. Insert the battery and push the holder back in. NOTE: • If the tool does not respond to the wireless remote control even when the remote control is operated close to the tool, the battery (CR2025) is dead. Replace it with a fresh battery. • The included battery is provided for sample use and may not last as long as commercially available batteries. Wireless remote control range EN [Fig.14] The remote control should be operated within approximately 50 cm and approximately 60° vertically and horizontally of the perpendicular relative to the infrared receiver on the tool. • Under the following circumstances, you may not be able to operate the tool, even within this range. - If there is an object between the remote control's transmitter and the tool's receiver. - Use outdoors or in other environments where the remote control receiver is exposed to a strong light source, or when the remote control transmitter or receiver is dirty may cause the tool to fail to respond, even when the remote control is used within the operating range. [Main Unit] CAUTION: If a tool holder is used with the Panasonic EYF series assembly tools, make sure the tool's trigger switch doesn't hit the tool holder. It may run the tool accidentally and result in battery failure by unexpected battery discharge. [Fig.15] CAUTION: When storing or carrying the tool, set the Forward/Reverse lever to the center position (switch lock). NOTE: Exercise caution to ensure no objects come into contact with the tool's trigger switch. If an object comes into contact with the tool's trigger switch, even while the Forward/Reverse lever is in the center position (locked), a small amount of electric current may continue flowing, which may cause an excessive discharge from the battery pack and subsequent battery pack failure. - 15 -
-
 1
1 -
2
-
3
-
4
-
5
-
6
-
7
-
8
-
9
-
 10
10 -
 11
11 -
 12
12 -
 13
13 -
 14
14 -
 15
15 -
 16
16 -
 17
17 -
 18
18 -
 19
19 -
 20
20 -
21
-
22
-
23
-
24
-
25
-
26
-
27
-
28
-
29
-
30
-
31
-
32
-
33
-
34
-
35
-
36
-
37
-
38
-
39
-
40
-
41
-
42
-
43
-
44
-
45
-
46
-
47
-
48
-
49
-
50
-
51
-
52
-
53
-
54
-
55
-
56
-
57
-
58
-
59
-
60
-
61
-
62
-
63
-
64
-
65
-
66
-
67
-
68
-
69
-
70
-
71
-
72
-
73
-
74
-
75
-
76
 |
 |