Panasonic EYFMA2C Owner s Manual - Page 16
Switch and Forward/Reverse, Lever Operation, Control Panel
 |
View all Panasonic EYFMA2C manuals
Add to My Manuals
Save this manual to your list of manuals |
Page 16 highlights
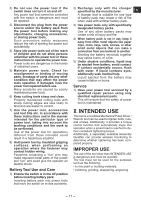
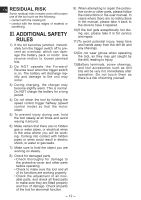
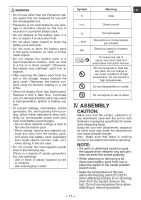
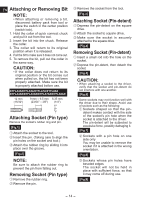
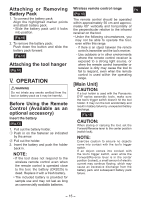
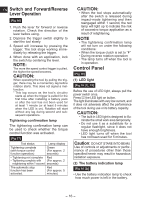
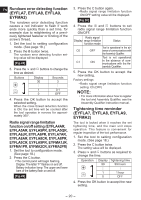
EN Switch and Forward/Reverse Lever Operation [Fig.16] 1. Push the lever for forward or reverse rotation. Check the direction of the lever before using. 2. Depress the trigger switch slightly to start the tool slowly. 3. Speed will increase by pressing the trigger. The tool stops working immediately by releasing the trigger. 4. When done with an application, lock the switch by centering the lever. NOTE: The more the speed control trigger is pulled, the higher the speed becomes. CAUTION: When operating the tool by pulling the trigger, there may be a momentary lag before rotation starts. This does not signal a malfunction. * This lag occurs as the tool's circuitry starts up when the trigger is pulled for the first time after installing a battery pack or after the tool has not been used for at least 1 minute (or at least 5 minutes when the LED is on). Rotation will start without any lag during second and subsequent operations. Tightening confirmation lamp The tightening confirmation lamp can be used to check whether the torque control function was activated. [Fig.17] Tool status Lamp display Tightening complete (with torque control function operation) Green (For approx. 2 seconds) • Tightening not complete Red • Tightening complete with (For approx. 2 retightening within 1 second seconds) The automatic stop function has been activated. Red (For approx. 5 minutes) CAUTION: • When the tool stops automatically after the switch is released during impact-mode tightening and then reengaged within 1 second, the red lamp will light up to indicate the risk of excessive torque application as a result of retightening. NOTE • The tightening confirmation lamp will not turn on under the following conditions: • When the torque clutch is set to "F" • During reverse rotation operation • The lamp turns off when the tool is in operation. Control Panel [Fig.18] (1) LED light [Fig.18 (1), 19] Before the use of LED light, always pull the power switch once. Press the LED light on button. The light illuminates with very low current, and it does not adversely affect the performance of the tool during use or its battery capacity. CAUTION: • The built-in LED light is designed to illuminate the small work area temporarily. • Do not use it as a substitute for a regular flashlight, since it does not have enough brightness. • LED light turns off when the tool has not been used for 5 minutes. Caution: DO NOT STARE INTO BEAM. Use of controls or adjustments or performance of procedures other than those specified herein may result in hazardous radiation exposure. (2) The battery indication lamp [Fig.18 (2)] • Use the battery indication lamp to check how much power is left in the battery. - 16 -
-
 1
1 -
2
-
3
-
4
-
5
-
6
-
7
-
8
-
9
-
10
-
 11
11 -
 12
12 -
 13
13 -
 14
14 -
 15
15 -
 16
16 -
 17
17 -
 18
18 -
 19
19 -
 20
20 -
 21
21 -
22
-
23
-
24
-
25
-
26
-
27
-
28
-
29
-
30
-
31
-
32
-
33
-
34
-
35
-
36
-
37
-
38
-
39
-
40
-
41
-
42
-
43
-
44
-
45
-
46
-
47
-
48
-
49
-
50
-
51
-
52
-
53
-
54
-
55
-
56
-
57
-
58
-
59
-
60
-
61
-
62
-
63
-
64
-
65
-
66
-
67
-
68
-
69
-
70
-
71
-
72
-
73
-
74
-
75
-
76
 |
 |
