Panasonic HC-V180K Advanced Operating Manual - Page 91
Select the video input on the TV., Change the mode to, to play back., When performing [CONVERT TO MP4]
 |
View all Panasonic HC-V180K manuals
Add to My Manuals
Save this manual to your list of manuals |
Page 91 highlights
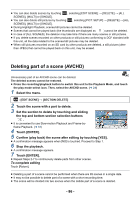
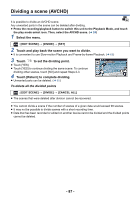
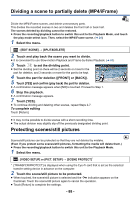
2 Select the video input on the TV. ≥ Example: Select the [HDMI] channel with an HDMI mini cable. Select the [Video 2] channel with a Composite video cable. (The name of the channel may differ depending on the connected TV.) ≥ Check the input setting (input switch) and the audio input setting on the TV. (For more information, please read the operating instructions for the TV.) 3 Change the mode to to play back. ≥ When this unit and the TV are connected with the HDMI mini cable (supplied) or a Composite video cable (commercially-available) in any of the following situations, no image will be displayed on the TV. Use LCD monitor of this unit. j Recording motion pictures j When setting PRE-REC j When saving the Highlight Playback scene or a manually edited scene j When performing [CONVERT TO MP4] ≥ If you connect this unit to the TV when this unit is set to Recording Mode, a squealing sound* may be output. Before connecting this unit, set it to Playback Mode. * The microphone may pick up the sound from the speakers, producing an abnormal sound. ≥ When connected to the TV, sound in Playback Mode is not output from this unit. Also, since the volume cannot be adjusted with this unit, adjust the volume of the TV. ≥ Some screens, such as the menu screen, may be displayed in reduced sizes on the TV. - 91 -
-
 1
1 -
2
-
3
-
4
-
5
-
6
-
7
-
8
-
9
-
10
-
11
-
12
-
13
-
14
-
15
-
16
-
17
-
18
-
19
-
20
-
21
-
22
-
23
-
24
-
25
-
26
-
27
-
28
-
29
-
30
-
31
-
32
-
33
-
34
-
35
-
36
-
37
-
38
-
39
-
40
-
41
-
42
-
43
-
44
-
45
-
46
-
47
-
48
-
49
-
50
-
51
-
52
-
53
-
54
-
55
-
56
-
57
-
58
-
59
-
60
-
61
-
62
-
63
-
64
-
65
-
66
-
67
-
68
-
69
-
70
-
71
-
72
-
73
-
74
-
75
-
76
-
77
-
78
-
79
-
80
-
81
-
82
-
83
-
84
-
85
-
 86
86 -
 87
87 -
 88
88 -
 89
89 -
 90
90 -
 91
91 -
 92
92 -
 93
93 -
 94
94 -
 95
95 -
 96
96 -
97
-
98
-
99
-
100
-
101
-
102
-
103
-
104
-
105
-
106
-
107
-
108
-
109
-
110
-
111
-
112
-
113
-
114
-
115
-
116
-
117
-
118
-
119
-
120
-
121
-
122
-
123
-
124
-
125
-
126
-
127
-
128
-
129
-
130
-
131
-
132
-
133
-
134
-
135
-
136
-
137
-
138
-
139
-
140
 |
 |
