Panasonic HC-X2000 HC-X1500 Advanced Operating Manual - Page 169
TV/monitor, Connecting to External Devices, Connecting with headphones and TV/monitor - uhd 4k
 |
View all Panasonic HC-X2000 manuals
Add to My Manuals
Save this manual to your list of manuals |
Page 169 highlights
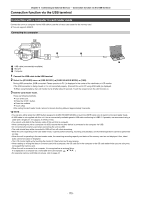
Chapter 8 Connecting to External Devices - Connecting with headphones and TV/monitor TV/monitor A TV or monitor can be connected as shown in the following figure. ≥ When using X2000 , use a BNC cable ( terminal) to connect a TV/monitor. A (For the X2000 ) BNC cable (commercially-available) B HDMI cable (commercially-available) C TV/Monitor ≥ By connecting this unit to a 4K video compatible TV/monitor using an HDMI cable, and playing back clips recorded with a recording format that has a resolution of UHD (3840×2160), you can enjoy the finely detailed video provided by 4K videos. If the TV/monitor is not compatible with 4K video, you can set [OUT FORMAT] and reduce the output resolution for playback. (l 158) @ NOTE When using a DVI converter, etc., to connect an HDMI cable to this unit, make sure that you connect last to the terminal on this unit. Connecting first to the terminal on this unit may cause a malfunction. 0 VIERA Link is not supported on the unit. Note that the VIERA Link of other device may not properly operate when connected to the VIERA Link compatible device with a HDMI cable (commercially-available). 0 The SD resolution signal output from the terminal is output as a progressive signal (480P, 576P). 0 (For the X2000 ) Use a commercially-available 5C-FB or equivalent double-shielded cable for the BNC cable. 0 Use a commercially-available High Speed HDMI cable. If possible, we recommend using a cable with a length of 3 m (approx. 9.8 feet) or less. 0 When this unit is connected to a TV/monitor while displaying the camera image screen, there may be some howling* caused. Press the button to switch to the thumbnail screen first before connecting this unit to a TV/monitor. * The microphone can pick up the sounds coming from the speaker which can cause unusual sounds. - 169 -
-
 1
1 -
2
-
3
-
4
-
5
-
6
-
7
-
8
-
9
-
10
-
11
-
12
-
13
-
14
-
15
-
16
-
17
-
18
-
19
-
20
-
21
-
22
-
23
-
24
-
25
-
26
-
27
-
28
-
29
-
30
-
31
-
32
-
33
-
34
-
35
-
36
-
37
-
38
-
39
-
40
-
41
-
42
-
43
-
44
-
45
-
46
-
47
-
48
-
49
-
50
-
51
-
52
-
53
-
54
-
55
-
56
-
57
-
58
-
59
-
60
-
61
-
62
-
63
-
64
-
65
-
66
-
67
-
68
-
69
-
70
-
71
-
72
-
73
-
74
-
75
-
76
-
77
-
78
-
79
-
80
-
81
-
82
-
83
-
84
-
85
-
86
-
87
-
88
-
89
-
90
-
91
-
92
-
93
-
94
-
95
-
96
-
97
-
98
-
99
-
100
-
101
-
102
-
103
-
104
-
105
-
106
-
107
-
108
-
109
-
110
-
111
-
112
-
113
-
114
-
115
-
116
-
117
-
118
-
119
-
120
-
121
-
122
-
123
-
124
-
125
-
126
-
127
-
128
-
129
-
130
-
131
-
132
-
133
-
134
-
135
-
136
-
137
-
138
-
139
-
140
-
141
-
142
-
143
-
144
-
145
-
146
-
147
-
148
-
149
-
150
-
151
-
152
-
153
-
154
-
155
-
156
-
157
-
158
-
159
-
160
-
161
-
162
-
163
-
 164
164 -
 165
165 -
 166
166 -
 167
167 -
 168
168 -
 169
169 -
 170
170 -
 171
171 -
 172
172 -
 173
173 -
 174
174 -
175
-
176
-
177
-
178
-
179
-
180
-
181
-
182
-
183
-
184
-
185
-
186
-
187
-
188
-
189
-
190
-
191
-
192
-
193
-
194
-
195
-
196
-
197
-
198
-
199
-
200
-
201
-
202
-
203
-
204
 |
 |
