Panasonic KX-FLB851 Multi-function Laser Fax - Page 19
Using the multi-purpose, input tray, Using the optional input tray
 |
UPC - 037988809851
View all Panasonic KX-FLB851 manuals
Add to My Manuals
Save this manual to your list of manuals |
Page 19 highlights
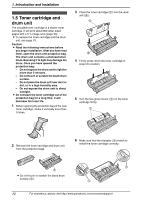
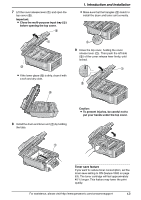
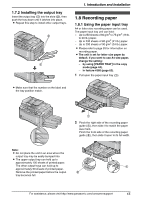
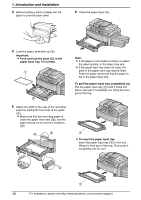
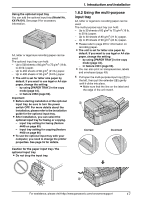
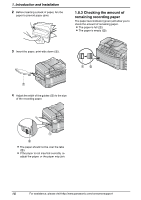
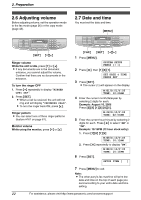
Using the optional input tray You can add the optional input tray (Model No. KX-FA101). See page 9 for accessory information. A4, letter or legal size recording paper can be used. The optional input tray can hold: - Up to 500 sheets of 60 g/m2 to 75 g/m2 (16 lb. to 20 lb.) paper. - Up to 460 sheets of 80 g/m2 (21 lb.) paper. - Up to 400 sheets of 90 g/m2 (24 lb.) paper. L The unit is set for letter size paper by default. If you want to use legal or A4 size paper, change the setting: - by using {PAPER TRAY} in the copy mode (page 44). - in feature #382 (page 62). Important: L Before starting installation of the optional input tray, be sure to turn the power switch OFF. For more details about the installation, please refer to the installation guide for the optional input tray. L After installation, you can select the optional input tray for faxing or copying. - input tray setting for faxing (feature #440 on page 65) - input tray setting for copying (feature #460 on page 66) L To use the optional input tray with your computer, you need to change the printer properties. See page 55 for details. Caution for the paper input tray / the optional input tray L Do not drop the input tray. 1. Introduction and Installation 1.8.2 Using the multi-purpose input tray A4, letter or legal size recording paper can be used. The multi-purpose input tray can hold: - Up to 30 sheets of 60 g/m2 to 75 g/m2 (16 lb. to 20 lb.) paper. - Up to 30 sheets of 80 g/m2 (21 lb.) paper. - Up to 25 sheets of 90 g/m2 (24 lb.) paper. L Please refer to page 93 for information on recording paper. L The unit is set for letter size paper by default. If you want to use legal or A4 size paper, change the setting: - by using {PAPER TRAY} in the copy mode (page 44). - in feature #381 (page 62). L You can also print on transparencies, labels and envelopes (page 49). 1 Pull open the multi-purpose input tray (1) to the left, then pull the extender (2) gently until it clicks into place. L Make sure that the line on the label and the edge of the unit match. 1 Correct Incorrect 2 For assistance, please visit http://www.panasonic.com/consumersupport 17
-
 1
1 -
2
-
3
-
4
-
5
-
6
-
7
-
8
-
9
-
10
-
11
-
12
-
13
-
 14
14 -
 15
15 -
 16
16 -
 17
17 -
 18
18 -
 19
19 -
 20
20 -
 21
21 -
 22
22 -
 23
23 -
 24
24 -
25
-
26
-
27
-
28
-
29
-
30
-
31
-
32
-
33
-
34
-
35
-
36
-
37
-
38
-
39
-
40
-
41
-
42
-
43
-
44
-
45
-
46
-
47
-
48
-
49
-
50
-
51
-
52
-
53
-
54
-
55
-
56
-
57
-
58
-
59
-
60
-
61
-
62
-
63
-
64
-
65
-
66
-
67
-
68
-
69
-
70
-
71
-
72
-
73
-
74
-
75
-
76
-
77
-
78
-
79
-
80
-
81
-
82
-
83
-
84
-
85
-
86
-
87
-
88
-
89
-
90
-
91
-
92
-
93
-
94
-
95
-
96
-
97
-
98
-
99
-
100
-
101
-
102
-
103
-
104
-
105
-
106
-
107
-
108
-
109
-
110
 |
 |
