Panasonic KX-FLB851 Multi-function Laser Fax - Page 52
Transparencies, 4.3 Labels, For Windows 98/Windows Me - all in one laser printer
 |
UPC - 037988809851
View all Panasonic KX-FLB851 manuals
Add to My Manuals
Save this manual to your list of manuals |
Page 52 highlights
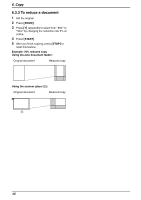
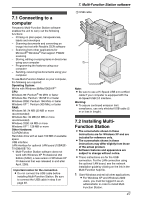
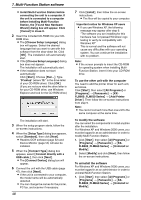
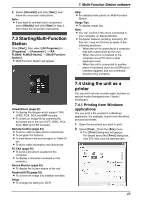
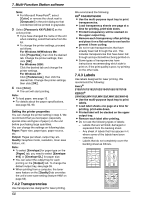
7. Multi-Function Station software Note: L For Microsoft PowerPoint®, select [Color] or remove the check next to [Grayscale] in the print dialog so that colored text will be printed in grayscale. 3 Select [Panasonic KX-FLB851] as the active printer. L If you have changed the name of the unit when installing, select that name from the list. L To change the printer settings, proceed as follows. For Windows 98/Windows Me: Click [Properties], then click the desired tab. Change the printer settings, then click [OK]. For Windows 2000: Click the desired tab and change the printer settings. For Windows XP: Click [Preferences], then click the desired tab. Change the printer settings, then click [OK]. 4 Click [Print]. L The unit will start printing. Note: L To load paper, see page 15. L For details about the paper specifications, see page 50, 93. Setting the printer properties You can change the printer setting in step 3. We recommend that you test paper (especially special sizes and types of paper) on the unit before purchasing large quantities. You can change the settings on following tabs. Paper: Paper size, paper type, paper source, etc. Output: Pages per sheet, output tray, etc. Quality: Graphics mode, resolution, toner save feature, etc. Note: L To select [Envelope] for paper type on the [Paper] tab, you need to select [Envelope #10] or [Envelope DL] for paper size. L You can select the output tray for each printing on the [Output] tab. To change the default output tray, see page 55. L When printing from a computer, the toner save feature on the [Quality] tab overrides the unit's toner save setting (feature #482 on page 63). 7.4.2 Transparencies Use transparencies designed for laser printing. 50 We recommend the following: 3M® CG3300/CG5000 L Use the multi-purpose input tray to print transparencies. L Load transparency sheets one page at a time for printing, print-side down. L Printed transparency will be stacked on the upper output tray. L Remove each transparency after printing and place it on a flat surface to cool and to prevent it from curling. L Do not re-use transparencies that have already been fed through the unit. This includes transparencies that have been fed through and ejected without being printed on. L Some types of transparencies have instructions recommending which side to print on. If the print quality is poor, try printing on the other side. 7.4.3 Labels Use labels designed for laser printing. We recommend the following: Avery® 5160/5161/5162/5163/5164/5165/5167/5168 XEROX® LWH100/LWH110/LWH120/LWH130/LWH140 L Use the multi-purpose input tray to print labels. L Load label sheets one page at a time for printing, print-side down. L Printed label will be stacked on the upper output tray. L Remove each label after printing. L Do not use the following types of labels: - Labels that are wrinkled, damaged or separated from the backing sheet. - Any sheet of labels that has spaces in it where some of the labels have been removed. - Labels that do not completely cover the backing sheet as follows.
-
 1
1 -
2
-
3
-
4
-
5
-
6
-
7
-
8
-
9
-
10
-
11
-
12
-
13
-
14
-
15
-
16
-
17
-
18
-
19
-
20
-
21
-
22
-
23
-
24
-
25
-
26
-
27
-
28
-
29
-
30
-
31
-
32
-
33
-
34
-
35
-
36
-
37
-
38
-
39
-
40
-
41
-
42
-
43
-
44
-
45
-
46
-
 47
47 -
 48
48 -
 49
49 -
 50
50 -
 51
51 -
 52
52 -
 53
53 -
 54
54 -
 55
55 -
 56
56 -
 57
57 -
58
-
59
-
60
-
61
-
62
-
63
-
64
-
65
-
66
-
67
-
68
-
69
-
70
-
71
-
72
-
73
-
74
-
75
-
76
-
77
-
78
-
79
-
80
-
81
-
82
-
83
-
84
-
85
-
86
-
87
-
88
-
89
-
90
-
91
-
92
-
93
-
94
-
95
-
96
-
97
-
98
-
99
-
100
-
101
-
102
-
103
-
104
-
105
-
106
-
107
-
108
-
109
-
110
 |
 |