Panasonic KX-THA11 Telephone Equipments - Page 32
Programmable Settings, Recording songs from an audio, device for ringer tones using the, handset
 |
UPC - 037988476282
View all Panasonic KX-THA11 manuals
Add to My Manuals
Save this manual to your list of manuals |
Page 32 highlights
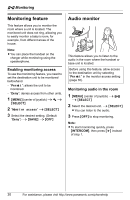
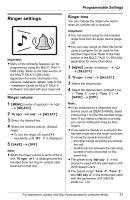
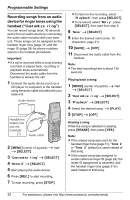
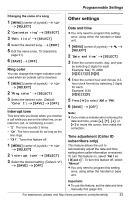
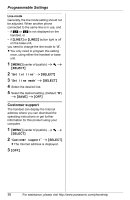
Programmable Settings Recording songs from an audio device for ringer tones using the handset ("Customize ring") You can record songs (max. 30 seconds each) from an audio device by connecting the audio cable included with your base unit. These songs can be assigned as the handset ringer tone (page 31) and the ringer ID (page 24) for phone numbers stored in the handset phonebook. Important: L If a call is received while a song is being recorded or played back, recording or playback stops automatically. Disconnect the audio cable from the handset to answer the call. 1 Connect the audio device (such as a CD player or computer) to the handset using the audio cable included with your base unit. Audio device Headphone output, line out, etc. Example: Audio cable 2 {MENU} (center of joystick) i f i {SELECT} 3 "Customize ring" i {SELECT} 4 "Record" i {SELECT} 5 Start playing the audio device. 6 Press {REC.} to start recording. 7 To stop recording, press {STOP}. L To listen to the recording, select "Playback", then press {SELECT}. L To re-record, select "Retry", press {SELECT}, then start from step 5. 8 "Save" i {SELECT} 9 Enter the desired name (max. 15 characters; page 21). 10 {SAVE} i {OFF} 11 Disconnect the audio cable from the handset. Note: L The total recording time is about 120 seconds. Playing back a song 1 {MENU} (center of joystick) i f i {SELECT} 2 "Customize ring" i {SELECT} 3 "Playback" i {SELECT} 4 Select the desired song. i {PLAY} 5 {STOP} i {OFF} Erasing a song While the song is selected or playing, press {ERASE}, then press {YES}. Note: L If the erased song was used for the handset ringer tone (page 31), "Tone 1" or "Tone 2" (default) is used instead of that song. L If the erased song was assigned to certain callers as ringer ID (page 24), the ringer ID assignment is canceled, and the handset ringer tone (page 31) is used instead of that song. 32 For assistance, please visit http://www.panasonic.com/phonehelp
-
 1
1 -
2
-
3
-
4
-
5
-
6
-
7
-
8
-
9
-
10
-
11
-
12
-
13
-
14
-
15
-
16
-
17
-
18
-
19
-
20
-
21
-
22
-
23
-
24
-
25
-
26
-
 27
27 -
 28
28 -
 29
29 -
 30
30 -
 31
31 -
 32
32 -
 33
33 -
 34
34 -
 35
35 -
 36
36 -
 37
37 -
38
-
39
-
40
-
41
-
42
-
43
-
44
-
45
-
46
-
47
-
48
-
49
-
50
-
51
-
52
-
53
-
54
-
55
-
56
-
57
-
58
-
59
-
60
-
61
-
62
-
63
-
64
 |
 |
