Panasonic KXP1121E Operating Instructions - Page 16
Setup, Installing the Software, System Requirements, Software Installation - driver for windows 7
 |
View all Panasonic KXP1121E manuals
Add to My Manuals
Save this manual to your list of manuals |
Page 16 highlights
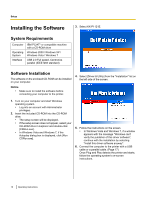
Setup Setup Installing the Software 3. Select KX-P1121E. System Requirements Computer Operating System Interface IBM PC/AT® or compatible machine with a CD-ROM drive Windows 2000 / Windows XP / Windows Vista / Windows 7 USB 2.0 Full speed, Centronics parallel (IEEE1284 standard) Software Installation The software on the enclosed CD-ROM can be installed on your computer. Notice • Make sure to install the software before connecting your computer to the printer. 4. Select [Driver & Utility] from the "Installation" list on the left side of the screen. 1. Turn on your computer and start Windows operating system. • Log into an account with Administrator privileges. 2. Insert the included CD-ROM into the CD-ROM drive. • The setup screen will be displayed. • If the setup screen does not appear, select your CD-ROM drive in Explorer and double-click [CDRun.exe]. • In Windows Vista and Windows 7, if the Autoplay dialog box is displayed, click [Run CDRun.exe]. 5. Follow the instructions on the screen. • In Windows Vista and Windows 7, if a window appears with the message "Windows can't verify the publisher of this driver software", continue with the installation by selecting "Install this driver software anyway". 6. Connect the computer to the printer with a USB cable or a parallel cable. (Page 17) Once Plug and Play detects the printer and starts, follow the operating system's on-screen instructions. 16 Operating Instructions
-
 1
1 -
2
-
3
-
4
-
5
-
6
-
7
-
8
-
9
-
10
-
 11
11 -
 12
12 -
 13
13 -
 14
14 -
 15
15 -
 16
16 -
 17
17 -
 18
18 -
 19
19 -
 20
20 -
 21
21 -
22
-
23
-
24
-
25
-
26
-
27
-
28
-
29
-
30
-
31
-
32
-
33
-
34
-
35
-
36
-
37
-
38
-
39
-
40
-
41
-
42
-
43
 |
 |
