Panasonic KXP1121E Operating Instructions - Page 17
Connecting to a Computer, Power Supply - printer driver
 |
View all Panasonic KXP1121E manuals
Add to My Manuals
Save this manual to your list of manuals |
Page 17 highlights
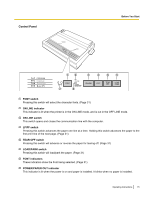
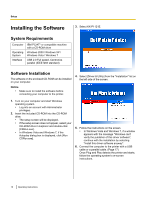
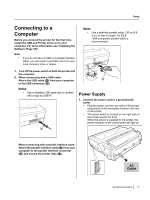
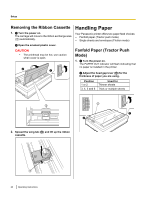
Setup Connecting to a Computer Before you connect the printer for the first time, install the USB and Printer driver on to your computer. For more information see "Installing the Software (Page 16)". Note • If you do not have a USB or a parallel interface cable, you will need to purchase one from your local computer store or dealer. 1. Turn off the power switch of both the printer and the computer. 2. When connecting with a USB cable: Attach the USB cable (B) from your computer to the USB connector (A). Notice • Use a shielded USB cable that is certified with a logo by USB-IF. A Notice • Use a shielded parallel cable 1.95 m (6 ft. 5 in.) or less in length. An IEEE 1284-compatible parallel cable is recommended. A B C Power Supply 1. Connect the power cord to a grounded AC outlet. • Plug the power cord into an outlet of the proper rating listed on the nameplate located in the rear of the printer. • The power switch is located on the right side of the printer toward the front. When the power is supplied to the printer, the power indicator on the control panel will light up. B When connecting with a parallel interface cable: Attach the parallel interface cable (C) from your computer to the parallel interface connector (A) and secure the printer clips (B). AC Outlet Operating Instructions 17
-
 1
1 -
2
-
3
-
4
-
5
-
6
-
7
-
8
-
9
-
10
-
11
-
 12
12 -
 13
13 -
 14
14 -
 15
15 -
 16
16 -
 17
17 -
 18
18 -
 19
19 -
 20
20 -
 21
21 -
 22
22 -
23
-
24
-
25
-
26
-
27
-
28
-
29
-
30
-
31
-
32
-
33
-
34
-
35
-
36
-
37
-
38
-
39
-
40
-
41
-
42
-
43
 |
 |
