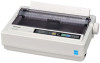
Panasonic KXP1121E Operating Instructions - Page 33
Troubleshooting - driver
 |
View all Panasonic KXP1121E manuals
Add to My Manuals
Save this manual to your list of manuals |
Page 33 highlights
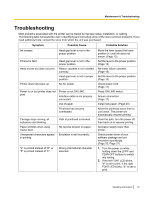
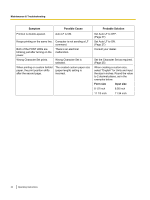
Maintenance & Troubleshooting Troubleshooting Most problems associated with the printer can be traced to improper setup, installation, or cabling. The following table will assist the user in identifying and correcting some of the more common problems. If you need additional help, contact the store from which the unit was purchased. Symptom Possible Cause Probable Solution Ink smears. Head gap lever is not in the proper position. Printout is faint. Head moves but does not print. Printer does not power up. Head gap lever is not in the proper position. Ribbon cassette is not installed correctly. Head gap lever is not in proper position. No AC power. Power is on but printer does not print. Printer is not ON LINE. Interface cable is not properly connected. Out of paper. Printhead has become overheated. Carriage stops moving, all indicators start blinking. Paper wrinkles when using tractor feed. Unexpected characters appear in printing. Path of printhead is blocked. No reverse tension on paper. Emulation is set incorrectly. "£" is printed instead of "#", or "#" is printed instead of "£". Wrong international character selected. Move the lever toward the lower position (+) until ink does not smear. (Page 13) Set the lever to the proper position. (Page 13) Re-insert ribbon cassette. (Page 18) Set the lever to the proper position. (Page 13) Check power cord. (Page 17) Press ON LINE switch. Secure connection. (Page 17) Install new paper. (Page 20) Allow the printhead some time to cool down. The printer will automatically resume printing. Clear the path, turn the power off, then back on to resume printing. Set paper supply lower than printer. Check printer driver of your software package and set emulation accordingly. (Page 25, Page 27) 1. Turn the power on while holding down the LF/FF and TEAR OFF buttons to switch this setting. 2. If the left FONT LED blinks, "#" is set to print. If the right FONT LED blinks, "£" is set to print. Operating Instructions 33
-
 1
1 -
2
-
3
-
4
-
5
-
6
-
7
-
8
-
9
-
10
-
11
-
12
-
13
-
14
-
15
-
16
-
17
-
18
-
19
-
20
-
21
-
22
-
23
-
24
-
25
-
26
-
27
-
 28
28 -
 29
29 -
 30
30 -
 31
31 -
 32
32 -
 33
33 -
 34
34 -
 35
35 -
 36
36 -
 37
37 -
 38
38 -
39
-
40
-
41
-
42
-
43
 |
 |
