Panasonic PV GS300 Digital Video Camera - English/ Spanish - Page 51
PRINTING PICTURES BY DIRECTLY CONNECTING TO THE PRINTER (PICTBRIDGE), When you stop printing halfway - specifications
 |
UPC - 037988980178
View all Panasonic PV GS300 manuals
Add to My Manuals
Save this manual to your list of manuals |
Page 51 highlights
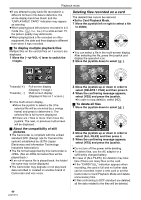
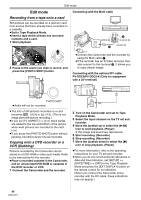
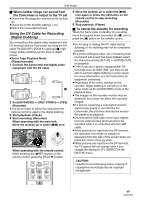
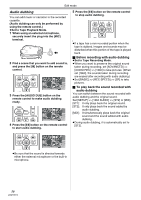
Edit mode Printing pictures by directly connecting to the printer (PictBridge) To print pictures by directly connecting the Camcorder to the printer, use a printer compatible with PictBridge. (Read the operating instructions for the printer.) ≥Insert a card and set to Card Playback Mode. 1 Connect the Camcorder and the printer with the supplied USB cable. 1 1 USB cable 3 Move the joystick left and right to select a desired picture, and then press it. 4 Select the desired number of prints. ≥You can set up to 9 prints. 5 Select the setting for date printing. ≥If the printer is not capable of date printing, this setting is unavailable. 6 Select [PAPER SIZE]. [STANDARD]: Size specific to the printer [4a5 INCH] [5a7 INCH] [4a6 INCH] [A4] ≥You cannot set paper sizes not supported on the printer. 7 Select [PAGE LAYOUT]. PictBridge ≥The [PictBridge] indication appears on the screen of the Camcorder. (When the printer is being recognized, the [PictBridge] indication blinks.) ≥When no card is inserted in the Camcorder, the [PictBridge] indication does not appear. (You cannot print any pictures.) ≥When the Camcorder and the printer are not connected properly, the [PictBridge] indication keeps blinking. (It will blink for over approx. 1 minute.) Connect the cable or check the printer. ≥We recommend using the AC adaptor as the power supply. ≥When images are displayed in multi-screen, they cannot be printed. 2 Select [SINGLE PRINT] or [DPOF PRINT]. ≥If there is no file with a DPOF setting, you cannot select [DPOF PRINT]. ≥When you select [DPOF PRINT] for printing, set the number of prints in DPOF setting. ≥When [DPOF PRINT] is selected, print after you determine the paper size. (Step 6) ≥When [DPOF PRINT] is selected, date printing is unavailable. [STANDARD]: Layout set on the printer [ ]: No frame [ ]: With frame ≥You cannot set a layout not supported on the printer. 8 Set [PRINT] >> [YES] to start printing. ª When you stop printing halfway Move the joystick down. ≥Avoid the following operations during printing. These operations disable proper printing. ≥Disconnecting the USB cable ≥Removing the card ≥Switching the mode dial ≥Turning off the power ≥Check the settings for the paper size, quality of print, etc. on the printer. ≥Still pictures recorded on other equipment may not be printed. ≥When the Camcorder and the printer are connected in the Tape Recording/Playback Mode, the [ ] Indication may appear on the LCD monitor. However, pictures cannot be printed. 51 LSQT0974
-
 1
1 -
2
-
3
-
4
-
5
-
6
-
7
-
8
-
9
-
10
-
11
-
12
-
13
-
14
-
15
-
16
-
17
-
18
-
19
-
20
-
21
-
22
-
23
-
24
-
25
-
26
-
27
-
28
-
29
-
30
-
31
-
32
-
33
-
34
-
35
-
36
-
37
-
38
-
39
-
40
-
41
-
42
-
43
-
44
-
45
-
 46
46 -
 47
47 -
 48
48 -
 49
49 -
 50
50 -
 51
51 -
 52
52 -
 53
53 -
 54
54 -
 55
55 -
 56
56 -
57
-
58
-
59
-
60
-
61
-
62
-
63
-
64
-
65
-
66
-
67
-
68
-
69
-
70
-
71
-
72
-
73
-
74
-
75
-
76
-
77
-
78
-
79
-
80
-
81
-
82
-
83
-
84
-
85
-
86
-
87
-
88
 |
 |
